|
|
|

Rotating
Sport Video Camera mounting bracket for Kayak
|
I
use my kayak not only for paddling, but for wildlife photography as well. I've had a notion for some time to do a little video from the kayak along with my photography. However, trying to shoot video from a wiggly kayak with a DSLR is not so easy. Then along came the GoPro HERO3 Black video camera, which opened up great possibilities for shooting video from my kayak.
I soon realized
though that I would have to find a good way to mount my GoPro.
A simple GoPro clamp on the bow handle seemed the easiest option,
but it didn't offer much in the way of versatility. The same clamp
on a pole stuck into a fishing rod holder behind me and waving
over my head wasn't any more versatile, and not much of a view
either. At the end of a long pole even the tiniest sway on a
wiggly kayak would surely be amplified - not the best way to
get good video. What I really wanted was a simple way to turn
the camera in any direction so I could film forward, or to the
side, or even film myself as I paddled and took photos.
That lead
me back to the idea of a bow mount, but it would have to be
some sort of rotating mount - sturdy, simple and easy to control on demand from the cockpit.
After doodling a dozen different ideas and puzzling through
the limitations each had with various rope control concepts,
I finally settled on the design presented here. It is easy to
make, mount and control, and costs very little, even if you
have to buy all the materials. Most of this stuff I had on hand
- leftover scraps of wood, PVC pipe and insulation foam, rope,
and screws and bolts. All I actually had to go buy were two
PVC pipe fittings and a small pulley.
This article
is mainly about the pulley and camera mount assembly part of
the unit, which is really quite independent from the method
of mounting the vertical pipe on which it sits. My bow handle
is a rigid handle, so clamping under the handle with the two
bars was a no-brainer for an attachment method. Its purpose
is simply to hold up the vertical length of 3/4 PVC pipe, which
the rotating mount slides onto.
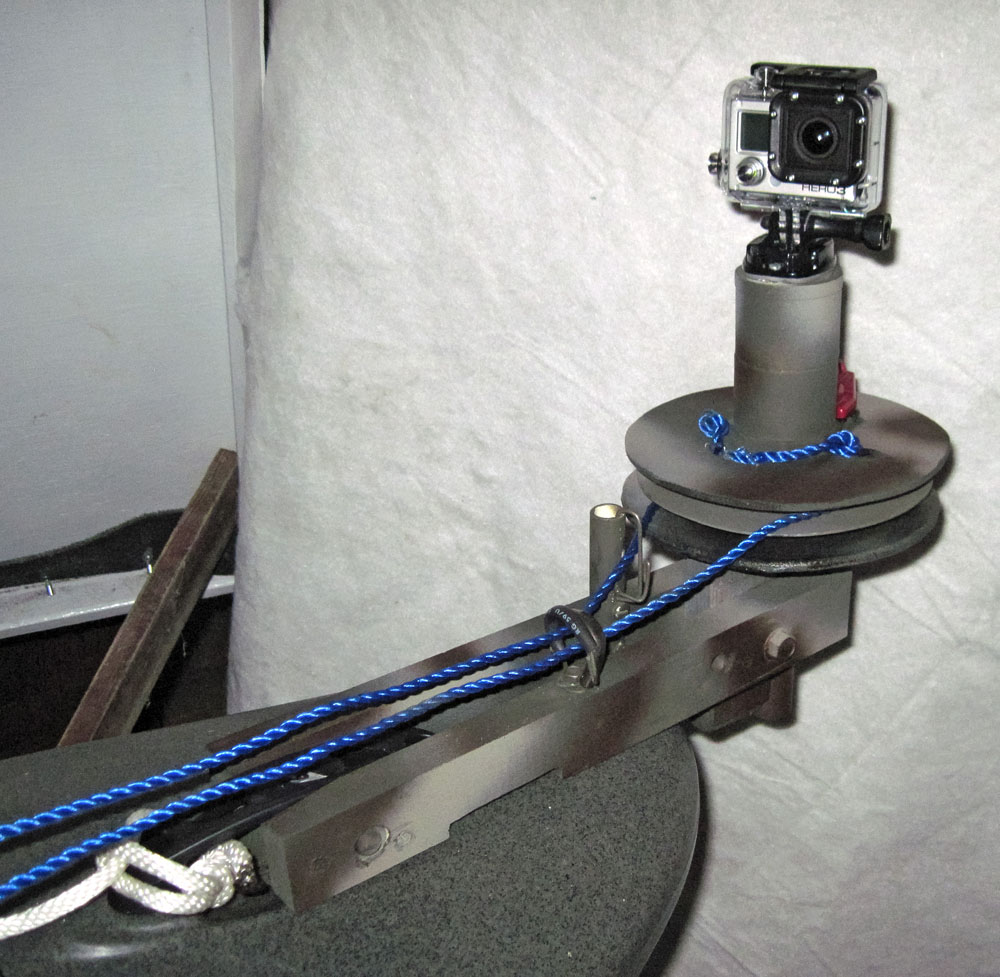
The left
photo shows the finished mount on the bow of my kayak. The two
wooden bars clamp together through the bow handle, holding the
vertical PVC pipe in place. The bars install and remove with
just two wing nuts. The pulley and camera mount assemply, ropes
and all, then slides on and off over the short length of 3/4
PVC pipe at the front of the two mounting bars. It doesn't really
matter what means you use to attach the vertical PVC pipe, so
long as the rotating mount can then slip on and off easily.
(The red item mostly hidden behind the mounting head in this
photo is a small plastic two-way bubble level I got from the
hardware store. It velcros onto the top disc so I can insure
the vertical pipe is level when I tighten the mount onto the
kayak handle.)
The real
trick to all this was to figure out a simple and effective method
of rotating the GoPro mount. The mount I used was one of the
peel-and-stick mounts that comes with every GoPro. Of course,
I don't trust peel-and-stick for anything, so in addition to
the sticky pad, I put a small screw through the black plastic
mount, screwing it securely into the top of the PVC cylinder
above the rope reels. I would think you could use this design
to mount and rotate any other good waterproof sports video camera,
not just the GoPro. Again, the rotating mount is independent
of both the means of mounting the vertical PVC pipe, or the
kind of attachment between the camera and the rotating mount
head.
At right
is a blow-apart view of the parts that make up the mounting
head/rope reel (pulley) assembly. This is the heart of the project,
and the real secret of why this works so well and so simply.
Click the thumbnail at right for a larger view of the diagram.
It shows no dimensions, since your version is not limited to
my exact measurements. In general the 3/16 plywood discs are
about 6 inches in diameter, and the 3/8 plywood discs are about
3 inches diameter. The center hole was drilled with a 7/8 inch
wood bit to allow a 3/4 PVC pipe to slide through without rubbing
inside the hole. The only place the vertical PVC pipe touches
the rotating mount is inside the top of the PVC cap. This minimizes
friction since there is a very small surface area that touches,
and PVC against PVC is quite slippery in any event. The PVC
cap and reducing coupling were for 1-1/2 inch pipe, with the
reducing fitting small end to fit 1-inch pipe. That gave a large
enough hole that the 3/4 vertical pipe would not rub and cause
friction. In addition, I will warn you against allowing the
bottom of the pulley assembly to rub on anything. My vertical
PVC pipe does not allow the pulley to rub the two mounting bars.
This would create drag and make the unit harder to spin.
A loose-fitting
attachment like this would have allowed a lot of jiggle and
shake, were it not for the secret ingredient - PVC pipe foam
insulation. A short length of this insulation of the right size
to both fit snuggly over the vertical PVC pipe, and snuggly
inside the PVC cap and reducing coupling acts as a bushing.
It makes for a snug fit when the pulley assembly slides on over
the vertical pipe. The foam is slippery enough against the PVC
that the assembly turns easily with the rope, yet it will not
spin around loosely by itself. It stays pointed where I set
it unless I turn it myself. Like the PVC, the foam insulation
is waterproof, won't corrode, and needs no lubrication.
The cut-away
view diagram at left (click for a larger view) shows how the
foam insulation works on the inside. The foam has to be cut
to size and inserted before the PVC cap and the reducing coupling
fittings are cemented together with PVC cement. This diagram
also shows how everything is assembled. The upper 3/16 disc
is screwed onto the upper PVC/foam head section. The other three
wooden discs are assembled along with the thin plastic disc
(I'll discuss this item shortly) and held together with screws.
Then the upper disc/head section is screwed to the lower assembly
of discs. This allows disassembly at any time, and makes replacing/re-threading
the ropes (if ever necessary) quite a bit easier.
Pay attention
to how the holes and slots are done for threading the pulley
rope. This is a single piece of rope of the right length to
reach from the bow to the cockpit pulley and back again. You
could attach the rope to these pulleys some other way, but using
my method will insure you don't have any screws or staples or
knots, or anything else inside the pulley to bind the ropes
as they wind and unwind. They will not pull off either with
my method, and they are easily replaceable.
I used a
separate pulley for each end of the rope so they could not get
crossed up or wrapped over each other and cause binding. The
thin plastic separator disc between the upper and lower pulleys
can be cut with scissors from the side of a 1/2 gallon milk
carton, or perhaps an old "Cool Whip" package lid, or any empty
plastic food packaging lid of sufficient diameter. Being tough
and flexible is all that's required, but be sure the edge is
trimmed smoothly. This applies to sanding the plywood disc edges smooth as well.
You don't want the rope fibers to get snagged on a rough edge.
And be sure you wind the rope around the upper and lower pulleys
in opposite directions, otherwise it will not work. I used three
wraps on each pulley, which allows me to turn the camera in
multiple 360 rotations in one direction before having the go
back the other way.
The cockpit
end of the rope loops through a small pulley (see the left photo),
sort of like a pulley style clothesline. The small pulley attaches
next to the cockpit by hooking a small bungee cord over my anchor
cleat. The bungee cord keeps just enough tension on the rope
to take up any slack. You don't want slack, because it might
allow the rope to come off the pulleys at the bow. I also added some rope guides/clips on the two wooden bars of the mounting bracket. These were simply bent from pieces of coat hanger wire and screwed into place. One uses a piece of 1/2 CPVC pipe to assist in guiding the rope. These guides also help to insure the rope does not slip off the pulleys. Your installation may not need these, but the type of rope I used tends to hold the bends from its original packaging. Between the guides and the bungee tension, I felt this issue was well resolved.
The last
step was to paint the wooden parts with some black paint to
keep out moisture, since using this on a kayak would surely
result in it getting wet - don't want that plywood to swell
and buckle. When that dried and all was assembled, I taped up things (like the GoPro plastic mount)
that did not need painting and I gave it a once-over with some
camo spray paint so it would blend in with the kayak color. That's it..... actually an easy project to do. The whole thing installs or uninstalls in a couple of minutes. The hardest part was figuring out the secret of the foam to make for a smooth, easy, but mechanically stable and snug fit for good rotation.
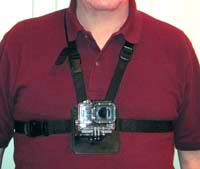
You might also check out my article on a homemade
chest mount for your GoPro video cam, shown at right.
|
|
 |
|
 |