|
|
|
|

Very Lightweight,
Folding Portable Blinds
|
First
a little history:
My early attempts at
portable blinds were based on a longstanding concept
that you had to be completely hidden inside a little "house"
for a blind to work. I've since learned through practical
experience that the "little house in the woods" concept
is often overkill, and not always the best or most practical
blind for many purposes, including wildlife and bird photography.
I've discovered far more portable, practical, simple and
very lightweight methods of camouflage that are just as
effective, if not more so.
 |  |
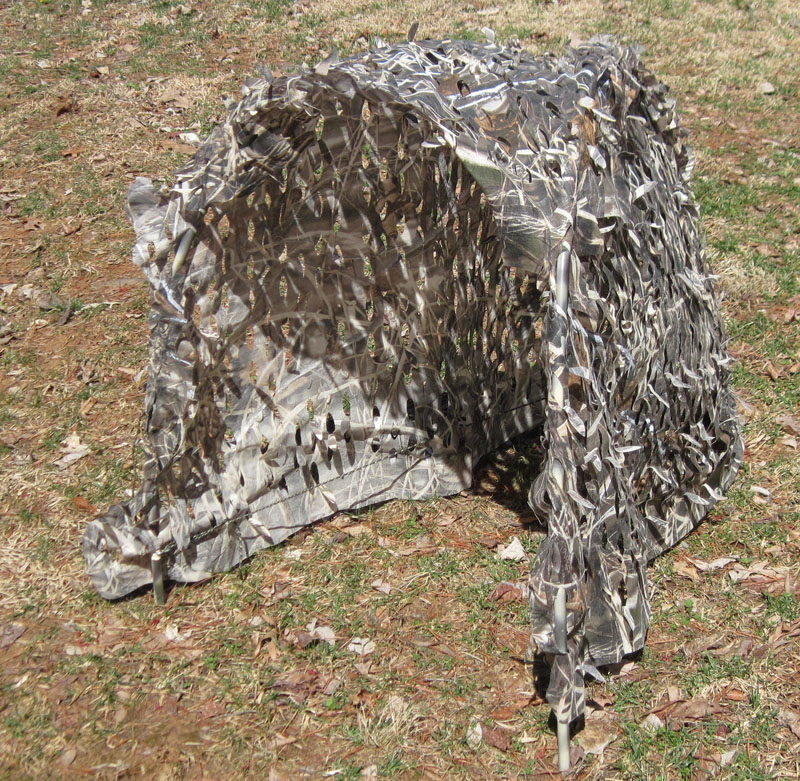
| The
"V" Blind | V
blind rear view. |
By
"very lightweight" I mean they weigh almost nothing -
certainly no more than your DSLR camera body alone. Now
that's light for a blind. Weight was an important consideration
when designing these blinds, but it wasn't the driving
force behind them. I wanted something to replace my "leafy
camo suit" when the weather got warm enough that even
that lightweight camo might get stuffy to wear.
These
blinds are in basic purpose similar to the one-man pop-up
blinds you can purchase for hunting. However, pop-up hunting
blinds can cost from $50 to over $200, and they are made
for hunting in even rainy, drizzly weather, being covered
with water repellant material. Thus they are heavy - as
much as 15 pounds or more. That's just too heavy to drag
around for photography. Besides, I have no need for a
weather-proof blind. I need sunshine for good photos,
thus I won't be wasting my time and effort shooting in
overcast, rainy weather. All I need is a fair weather
blind that's very light and very portable. The materials
and hardware for both of these blind frames together would
total less than $25, plus whatever camouflage material
you used to cover them.
To
that end I've created the two blinds shown at right -
the "V" blind, and the "Dog House" blind. Their designs
were inspired by another project of mine, the very practical
"Marsh Blind", where I used
flexible CPVC water pipe bent into arches for the frame.
This sort of construction is quite inexpensive, extremely
lightweight and easy to do.
 |
| The
"Dog House" Blind |
 |
Concept
diagram
for the "V" Blind |
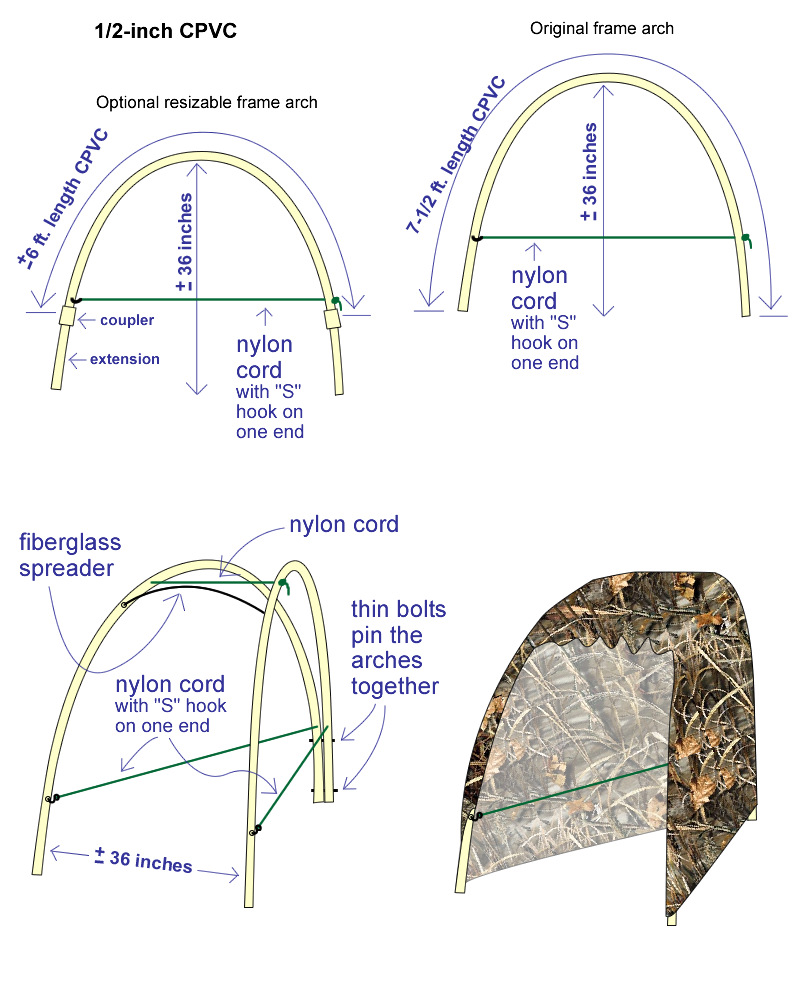
The "V" Blind:
The
"V" blind was my first effort trying to make a blind as
simplistic and minimal as possible, with as low a profile
as I could fit myself into while sitting on the ground
(no stool, though I do have a small pillow pad to sit
on).
The
"V" blind consists of only two small arches bent into
shape by 1/8-inch camo nylon cord knotted through the
pipe on one end and clipped with a small "S"
hook on the other end. The diagram
at left clearly shows the parts and method of construction.
The two arches are pinned together on one end by two small
bolts. A flexible "spreader" pushes the other ends apart,
while a piece of nylon cord limits how far they can spread.
It just couldn't be any simplier. The frame is covered
with my favorite die-cut camo material, used in many of
my projects.
The
front is open, just as with the "Marsh Blind",
because my camouflaged camera/lens cover and tripod skirt
act as the front of the blind, providing me and my equipment
with well proven cover and camouflage. If you desire the
front to be covered, it's a simple matter to add a drape
of camo across the front with whatever slits or holes
you wish. If you're shooting hand-held, this blind with
a covered front added would work just fine. However, shooting
with a large super-telephoto like a 500mm to 800mm lens
requires a tripod, and that size lens and tripod will
NOT fit inside this blind, with or without a front covering.
The lens and tripod must have their own camouflage covering
due to their size. In fact, the tripod's leg spread alone
would certainly be larger than the blind itself.
 |
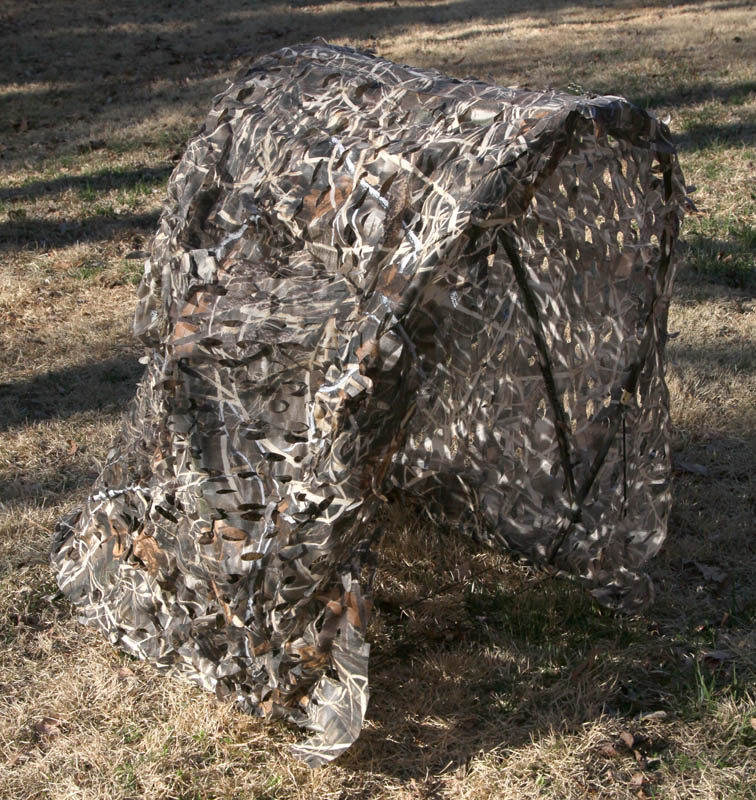
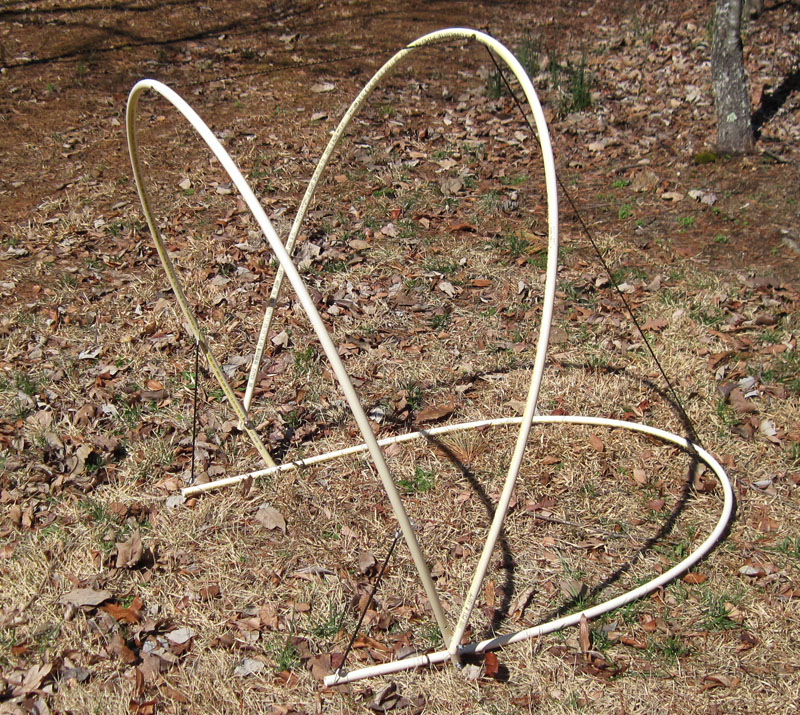
| V
blind folded flat for carrying/storing. |
|
Collapsing
the blind is as simple as removing the spreader so the
two arches fold flat. If there were some way to fold it
again to make it half-size for carrying it would be nice,
I agree, but in any event, it still weighs next to nothing
to carry. I would advise against cutting the pipe in half
at the top of the arch and trying to use pipe couplers
in an effort to make it smaller. The stress of bending
the pipe will split a coupler, even if you could somehow
make the coupler stay on the pipe ends. I do have a couple
of possible solutions for this on the back burner, and
if any of them pan out, I will post them as an update
to this article.
 |
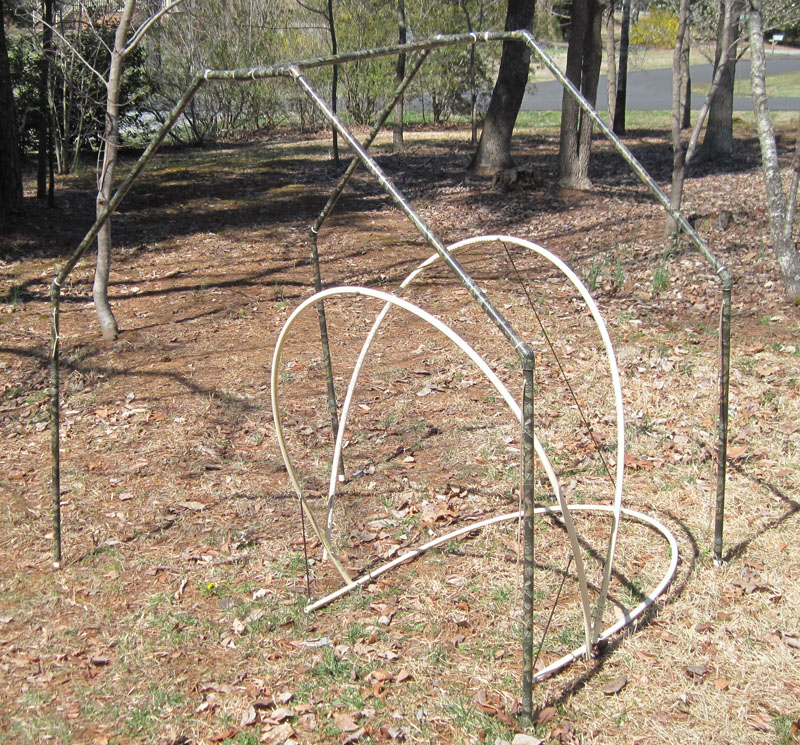
| |
Top
photo: Size comparisons of "V" Blind (right) with
Dog House Blind (left). Below: Dog House Blind compared
with a PVC blind
frame from another project. |
 |
The
spreader I use is a short length of fiberglass rod I found
among my collection of "stuff". I don't know where it
came from or where to find another one, but it worked
perfectly for this project. I'd love to find more of this
stuff, but I have no hopes of that. In any event, I can
suggest some options for you. Get a bicycle flag and cut
the small end from the fiberglass mast. It should work
well. Alternately you could substitute a thin wooden dowel,
perhaps 1/8-inch or 3/16-inch diameter. That should be
flexible enough. You may even have some flexible plastic
rods left over from an old kiddie tent that is defunct.
Maybe even an old one-piece car antenna of light spring
steel - anything thin and flexible. Simply cut your spreader
long enough that when it's installed, it will flex and
spread the two arches apart until the top nylon cord is
taut. Drill a hole in each arch so your spreader tips
will slip in and remove easily. Simple tension should
hold it in place.
One
other method to spread it would be to use a stiff spreader,
such as a 1/4-inch diameter dowel. Use a bungy cord of
the right tension to pull the arches together right at
the point where the dowel holds them apart. The dowel
and bungy cord counter each other. Another idea is to
use a left over end of the CPVC you cut off. Run a piece
of nylon cord inside it, and where the cord comes out
each end, thread that through holes in the arches and
knot or tie each end to the arches. The cord holds the
spreader in position and the spreader pipe holds the two
arches apart at the right distance. Any of these methods
would work, though some would be easier and quicker to
use than others.
 |
| Close-up
of bag for storing fiberglass spreader rod (shown
in bag). |
|
You'll
want to keep track of your spreader and not loose it.
I sewed a simple tubular
"bag" from camo netting to hold my spreader and a
couple of tent pegs. The bag is tied to the inside back
of the blind so I won't misplace or drop my one-of-a-kind
spreader and loose it in transport. In an emergency you
could possibly cut a tiny thin branch or sapling and use
it as a temporary spreader. It's a simple solution. Think,
think!! If you use a section of CPVC as your spreader,
one end could be permanently tied to one arch while the
other end is tied/untied when setting-up/collapsing the
unit. The permanently tied end will keep it from being
lost.
The
dimensions in the diagram are optional. This unit fits
my 5-foot 7-inch, 170 lb. frame. If you are larger and
huskier, you'll need to adjust the dimensions so the arch
is high enough for your seated height, and will spread
wide enough for your shoulders. One possibility is the
optional resizable frame idea in the diagram. By using
a shorter section of pipe for the main arch, and adding
extension pieces with couplers on the arch ends, you can
get the same total height while having removable ends
to make the frame a little smaller for transport. This
gets around the problem of putting the couplers in the
bend where they will fail under stress.
This
same idea could be used with the "original frame" sized
arch, by adding coupled extensions onto the ends to make
the unit even taller for larger people. It just takes
a little thinking to come up with solutions. Don't forget
that if you use couplers you will need a spacer between
the pipes on the rear by the bottom bolt to allow for
the coupler thickness. Also, concerning the bolts, the
upper bolt should not be more than 12-14 inches from the
pipe end for this size unit. Putting it too far up will
limit how far the arches will spread apart on the other
end. If you get it wrong, just drill a new hole lower
down and reinstall the upper bolt. Note that this design
will not work well without these bolts, as the two arches
will shift and lean to one side or the other if not bolted
in this fashion.
Covering
the frame with camo material is up to your discretion.
You can use a section of military camouflage netting,
burlap or any form of commercial camo material. It can
be draped over, particularly with the military netting,
but I'd recommend tying, lashing or using sewn loops or
shower curtain clips to hold any fabric type material
to the pipe frame.


|
| Dog
house blind frame raised, shown before and after
camo painting. |
|
The "Dog House" Blind:
 |
| |
Concept
diagram for
the Dog House Blind |
On
to the next blind, the "Dog House", so named because I
couldn't think of anything else apropos - too much
thinking to do! This is essentially the same as the
cover and frame I used for the "Marsh
Blind" project, except it has a third arch to
replace the mortar mixing tub as a base. It weights just
ounces more than the "V" blind above. It simply
flips up and down like a hood on a baby stroller - simple
and very effective. This too is meant to have as low a
profile as possible for your seated height. Again, the
pipe length used is optional. Just make it to fit your
height and shoulder width.
Options:
Looking at the concept
diagram at right, you can see that it can be held
up by using prop rods (upper left in the diagram). Instead
of prop rods, you could extend the ends of the bottom
arch and use small bungy cords to hold it up (lower right
in the diagram), just as I did with the Marsh Blind design.
However, note in the diagram that in this case you must
move the nylon tensioning cord from the vertical arch
over to the extended base arch so the cord does not interfere
with folding the unit flat.
In
either design, the tensioning cord will be under your
legs, so the blind won't suddenly lift off in a wind if
you don't have any tent stakes to hold it down (and
I assure you, it takes very little breeze to carry these
away). By adding a bottom cover, perhaps made from
heavy upholstery vinyl, you will not only have a damp-proof
bottom to sit on, your weight will also act to hold the
blind down in a wind. In any event, I do recommend you
have a couple of tent stakes with you, or else tie the
unit to something (a sapling, bush or dead limb for example).
Simply setting your equipment bag in the back (if you
have a vinyl base covering installed as suggested) will
suffice to weigh it down while you're not in it.


|
| |
The
folded frame shows how the arches nest when flat
(top). Details of the cord, hinge bolts and bungy
cord are at bottom. Both photos show the two cords
used for tensioning.
|
A
slight variation from the concept diagram is shown
in this photo, where I used a second nylon cord aft
of the hinge bolt to hold the arches in shape instead
of the one cord depicted in the diagram. It's also quite
easily seen in this
photo. The second cord is not necessary, but I figured
it couldn't hurt either.
Though
the concept diagram shows the middle frame arch at about
a 45° angle, it will probably work better if angled
upwards closer to 30 degrees from vertical as in the finished
version depicted
in this photo. This should allow a little more headroom.
Also note the base arch does not nest as close to the
others in the finished version (shown
in this photo) as was depicted in the concept diagram.
Though all three arch pipe lengths are very close in measurement,
the base arch looks smaller because it is shifted forward
at the hinge point so the ends protrude forward to provide
leverage for the bungy cords. Had the base arch nested
as shown in the diagram, it would have taken most of the
10-foot length of the pipe Such a large base arch is unnecessary.
 |
| The
Dog House Blind folded for storing or transport |
|
The
actual finished lengths for the three arch pipes are:
(1) front arch
- 8 feet [=96 inches]
(2) middle arch
- 7 feet, 10 inches [=94 inches]
(3) base arch -
7 feet, 6 inches [=90 inches]
Keep in mind that these dimensions make a blind that fits
my build (and in fact is 10-12 inches wider than I need).
You may have to adjust these dimensions to suit your height
and body build.
Just
as for the "V" blind, you could add a drape to the front
for hand-held photography instead of having it open in
front. The covering could be any option from military
netting to commercial camo fabric, though military netting
would make the blind at least three or four times heavier
than a lightweight material. You could start with a "fall/winter"
pattern covering on it and then in spring and summer drape
a greener cover or military netting right over the first
cover. That way you would only have to carry the extra
weight of the netting in season and not all year long.
A better idea might be to make a cover of lightweight
summer and winter camo materials back to back, and simply
turn the cover inside out to change the season. All that
is needed is to tie the cover onto the frame at several
strategic spots around the frame with short pieces of
nylon cord. Then untie the cords, flip the cover over
and tie the cords again.
|
| |
|
|
 |
|
 |