|
|
|
|

Portable
Blind with seat for Wetlands/Marsh
|
I
really do like my Walkstool, and use it all the time when
shooting from a tripod set low for a low profile. However,
there were times when I wanted to set up on the edge of
a shallow marsh, and I knew my Walkstool, or any seat
with legs for that matter, would sink right into the muck.
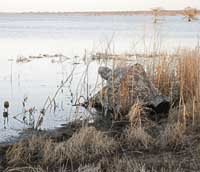 |
| Marsh
Blind setup at Lake Mattamuskeet |
Then
one day, while watching Doug Gardner's Wild Photo Adventures
episode one - Waterfowl of Eastern North Carolina, I was
inspired with an idea for a solution. Doug talked about
using a mortar mixing tub as a floating equipment carrier.
After a little thought, I decided if I was going to tow
this thing along behind me anyway, why not take the idea
one or two steps farther? I could turn it into a portable
blind with comfortable seat that wouldn't sink into soft
wet marshy ground.
 |
Finished
blind with canopy down,
showing seat folded down and up |
 |
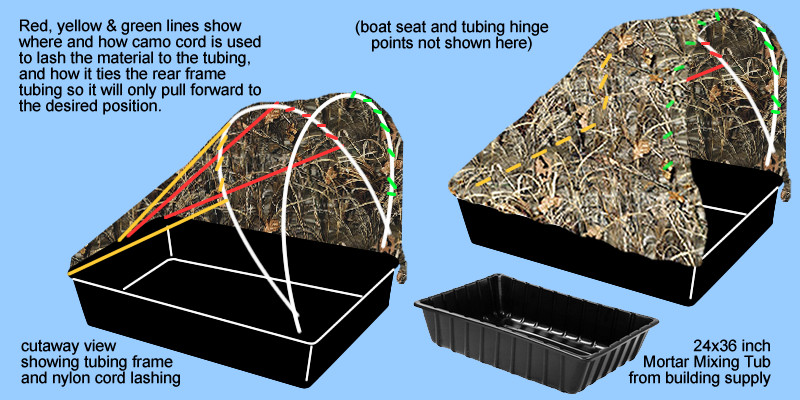
I
started with a 24x36-inch
plastic mortar mixing tub purchased for about $13
(available at most building supply stores). I already
had a very comfortable boat seat that I used on the ground,
but it only worked well if I was on the edge of a bank
or drop-off where my legs could hang down a little and
be a bit lower than my body. This folding seat was ideal
to mount inside the tub for seating.
 |
Seat
mount assembly lifted
up to show details |
First
I cut a piece of 1/4-inch plywood to just fit inside the
bottom of the tub so it couldn't shift around. Next I
screwed and glued four 2x3 "posts" to the plywood base.
Then a 12-inch square piece of 5/8 plywood was screwed
and glued on top of the posts. This formed the seat
mounting platform. The posts were high enough to position
the seat just above the top edge of the tub. The seat
was then screwed to the 12"x12" plywood to complete the
seat assembly.
Then
I made a cardboard template to get the shape needed for
a bracket that would support the canopy frame. From the
template I cut out a piece of 5/8 plywood to make the
bracket, which screwed to the front seat posts under the
seat. The ends of the bracket curved up and out of the
tub. This gave me a place to hinge the canopy frame so
it can fold up or down. I glued and screwed a 1x2 to the
plywood bracket "ears" to reinforce the plywood where
the hinge bolt would go, which was rather narrow where
it curved up between the seat and the edge of the tub.
This also gave me a thick enough block to drill for the
bolt used as the hinge. Finding a suitable angle to drill
the bolt hole to hinge at the correct angle was the hardest
part of this project. Everything was at an odd angle because
the curved canopy frame pipe was not directly vertical,
but was angled slightly as shown in this
diagram. It took a bit of trial and error, and hole
reaming, to get the bind out of the hinge point.
 |
Illustration
of seat mounting
platform and hinge bracket |
 |
Illustration
of CPVC canopy
frame and canopy lashing |
I
made the canopy frame from two 10-foot lengths of 1/2-inch
(15mm) CPVC pipe, which is very flexible. (Do NOT try
to use 1/2-inch PVC. It is not flexible enough
for this. Be sure to get CPVC.) This was also
purchased at my local hardware supply. The front frame
loop of CPVC was cut 7' 5" long, which made a loop just
tall enough for my seated height. Depending upon how tall
you are, yours may have to be longer so your loop is tall
enough for you to sit under comfortably without hitting
your head. The back loop was cut shorter, only 6' 9" long,
as it hinges on the front frame loop above the front loop's
hinge and nestles just inside the larger front loop when
folded down so they both would lay flat.
The
canopy
frame was then covered with Hunter's Specialties Camo
Leaf Blind die-cut material in Advantage Max 4-D pattern
(the same as was used on several other projects on this
site). I used 1/8-inch nylon camo cord to lash the material
to the front canopy frame loop. I used more of the camo
cord to tie the back canopy frame loop to the rear of
the tub so the frame would only hinge forward as far as
needed. I wove the cord through the material die-cuts
to support the material, and lashed the material to the
back canopy frame with it as well. Once the front and
back canopy loops were lashed to the material, they were
held in place and worked in unison. Pulling up the front
canopy loop raised the whole canopy. Once raised, two
small bungy cords hold the front loop in place so it won't
flop back. Yet, if I forget to unhook the cord and try
to fold down the canopy, it won't break anything either,
because the bungy cord will stretch.
| The
completed unit is a breeze to use. Just flip up
the seat back, then flip up the canopy, hook the
two bungy cords and it's all ready to go. I takes
only seconds. |
 |
Seat
mount assembly lifted up
to show hinge bracket |
 |
Another
view of the canopy
frame
hinge bolts and bracket |
 |
| Top down view of canopy frame hinges |
 |
| Another detail of the hinge |
More
Photos:
These
photos show additional details. I have intentionally left
out most measurements, bolt sizes, etc. since this article
is meant to be only a starter for your version. For example,
you could make a seat from a plank covered with padding
and vinyl instead of using a boat seat. You could use
1/2-inch PVC with 45° elbows to make your canopy frame
instead of the flexible CPVC I used. Use your own creativity
to make something that suits your situation and needs.
Three
of these photos show different views of the canopy hinge
bolts. The black bungy cord is clipped onto the end of
the pipe for storage when the canopy is down.
The
lower left image shows the canopy frame up. The top end
of the bungy cord is hooked into a hole in the pipe and
the bottom end is hooked into a hole in the tub rim to
tension the frame in the up position. The second bungy
cord is only a spare, stored on the frame, in case a cord
breaks, or to supplement the tension in windy conditions.
You might notice that I covered some of the pipe with
a black material, but this is not really necessary. I
was experimenting with an idea. Usually I paint the pipe
frames I've used in these projects, or covered them with
camo tape, but you could just leave it the original color.
I'm not sure it matters, so long as it's underneath camo
material anyway.
In
these center photos ( below) I stuck my foot out so it
would be obvious there was a photographer inside. Otherwise,
you can't really tell. This blind, along with the lens
cover and tripod skirt, makes a very effective, comfortable,
compact and portable blind for marshy, wet environments.
The tub doubles as a gear carrier whether the canopy is
up or down. WIth the pull rope, the tub should glide easily
over grass and float on water, minimizing the amount of
weight you would otherwise need to carry by hand, or on
your back.
 |
| Canopy
frame in up position |
|
 |
| Side
view of blind with photographer, tripod and
super-telephoto. |
|
 |
| Low
angle view of frame |
|
 |
Detail
of cord lashing camo
material to frame |
|
 |
| Angle
view of blind with tow rope |
|
 |
| Angle
view of blind with photographer, tripod and super-telephoto |
|
 |
| Detail
of storage area behind seat |
|
 |
| Front
view |
|
 |
| Despite
its compact size, the blind feels cozy without being
confining |
|
| |
Lightweight
Folding
One-man Blinds
 |
There
is storage behind the seat to transport some gear - at
least a large backpack or dry-bag full. You can also use
bungy cords, hooked under the tub rim, to secure your
gear if it's stacked. With a little creativity, you can
make your own version of this combination "floating carrier/collapsing
blind/comfortable dry seat" for marshy ground. With the
addition of the matching camouflage lens
cover and tripod skirt, you have a highly effective
and complete camouflage blind that is very inexpensive
to make.
If
you're interested in some featherlight portable one-man
blinds, check out this article
for these two folding blinds pictured at right. |
| |
|
|
 |
|
 |