 |
|
|
|

Transporting and Protecting Your Super-telephoto
|
My
500mm lens was a major investment, especially considering
this is a hobby and not a money-making venture. Babying
this lens is a priority. I simply cannot afford to not
protect my investment. While prudence and common sense
when handling and using the lens is the first line of
protection, I also had to consider what happens to it
when it's packed and transported (essentially out of your
sight inside some sort of carrier). Anything bumping and
rubbing it ( zippers, other equipment, etc.) can go unseen
until you discover scratches and nicks, or worse. I've
spent considerable time figuring out the best way to transport
this beast for the varied shooting situations I run into
with wildlife photography. It's a challenge, to say the
least, trying to provide ample protection while
minimizing weight and bulk and maximizing accessibility.
The
hard case that comes with the lens (affectionately known
as the "coffin") is great protection when shipping it,
or when it's packed away with other cargo. However, it's
not a very handy or practical way to carry the lens when
I need to access it constantly for shooting. Such a hard
case in my front seat, for example, is far too big, cumbersome
and unwieldy to open and shut. Banging and scratching
the interior of my car (or bumping my elbow for that matter)
with a hard case is not my idea of fun. Having to take
the lens off the camera body every time I need to put
it away is simply unworkable. I really needed some easier-to-handle
protection for the lens.
My
initial solution is described in this article -"Super-telephoto
Lens Case for Backpacking". Though I've never actually
backpacked with the lens in this homemade protective case,
I do use it as the default camera bag for my 500mm lens,
while the hard case is banished to the back of my closet.
This backpack case is soft, has multiple handles to make
carrying it a breeze, and I never have to worry about
it scratching or banging either my vehicles or myself.
I set it in the passenger seat of my vehicle and seatbelt
it in place, making it easy to reach and access. With
the "lid" flipped open, I can slide the lens in and out
with both the lens hood and camera body still attached.
It provides excellent protection while being handy and
easy to use. When I need the seat space for other items,
I set it in the passenger floorboard and it's still easy
to reach and use.

|
Lowepro
Vertex 300
|
Along
the way I came across a good deal on a large used camera
backpack/laptop carrier, the Lowepro
Vertex 300, to use for backpacking my other camera
equipment. I found that the 500mm would also go inside
it, but the pack was really not well suited for that purpose.
The Vertex 300 itself weighed virtually as much as the
500mm lens, adding to the overall bulk, so I never actually
used it with the 500mm. If I wanted to just carry the
500mm, the homemade backpack case was lighter, more practical,
and offered much more protection.
Eventually
I got into kayaking, which provided another avenue for
me to access locations for wildlife photography. I don't
yet try to use the 500mm in the kayak. The lens is enough
of a bear to handle on dry land with a good tripod and
gimbal. No way was I going to try shooting with it from
such a small watercraft. Along with the weight and handling
issue there is also the concern of dunking such expensive
glass in the water, mostly precipitated by the weight
and handling issue itself, and not by any concerns over
the boat's stability.
 |
| Dry
Bag/Camera Bag for Kayaking |
Shooting
with a 500mm from the kayak, and transporting it in the
kayak are two completely different issues though. With
a good drybag and some padding, carrying the lens in a
kayak is not such a concern. For my smaller lenses, I've
made padded "sleeves" that fit into drybags which work
well. The first such project was a dual camera pack which
is outlined in ""Kayaks,
Water, and DSLR Cameras - How I Manage Mine" on my
"Casual
Kayaker" site. The second project was for a single
lens and camera, and is featured in "Dry
Bag/Camera Bag for Kayaking".
After
leaving my 500mm behind on a trip to Shackleford Banks
to photograph the wild mustangs there, I decided I needed
to come up with a solution for an alternate means to carry
it. I couldn't take it to Shackleford in the special padded
backpack I'd made for it because I had to use my Kelty
hiking backpack to carry my jacket, two smaller lenses
and two camera bodies on that trip. I could hardly have
worn two backpacks, so I vowed to somehow take the 500mm
the next time I went to Shackleford. All I needed was
to get it there on the ferry. Once there, I could take
it out of the backpack and mount it on the tripod for
walking around. I ended up wrapping it in a towel and
stuffing it into the Kelty backpack with my other gear.
I was very uncomfortable with the solution. It worked
out, but I wanted something safer than a towel.
|
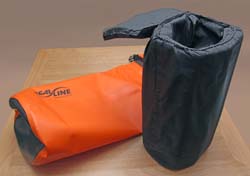
Padded
insert for standard
cylindrical 20-liter dry bag.
|

Completed lens
barrel sleeve |

Lens
barrel sleeve velcroed over lens |

Lens
barrel sleeve slipped fully
into place
under the hood |
From
my experience creating the padded inserts for the drybags,
I came up with the idea of simple padded sleeves to slide
onto the lens. The sleeved 500mm would then just slip
into the Kelty backpack with the smaller lenses. It wouldn't
have the armored protection of either the custom backpack
I'd made, or the original hard case, but it would certainly
have better protection than a towel could provide. With
the sleeves made from ripstop nylon sewn over 3/4-inch
thick grey sheet foam, they would also provide some moisture
protection if the backpack got wet.
The
technique for making these "padded sleeves" was virtually
the same as I used for the padded inserts in the "Dry
Bag/Camera Bag for Kayaking" project. I hot-glued
sheet foam into cylinders (one the diameter of the lens
barrel, and one the diameter of the hood), but I only glued
the butted edges about 1/3 the way up so there was a "slit
side" the rest of the way. This slit was necessary to fit around the tripod foot on the barrel sleeve. It wasn't necessary on the hood sleeve, but I thought it might serve to velcro tighter if there was a slit there too. I hot-glued circular end caps
of foam to plug one end of the barrel cylinder, and sewed
ripstop nylon inserts and sleeves to cover the inside
and outside of both foam cylinders. I attached velcro
and a strap to hold the "slit" end tight once installed on the lens. That was pretty much it. Nothing complex about this project.

The
hood sleeve |

Lens
barrel sleeve
|
In
the left image, the barrel sleeve is shown slipping over
the lens. The top of the sleeve in the photo has 2 inches
of foam padding in the "cap" to cushion the lens rear
cap. This is the end the lens will sit on when carried
in the backpack. At right is the completed barrel sleeve
with the blue velcroed strap. The sleeve slides onto the
barrel and is velcroed snuggly by the blue strap under
the lens tripod foot. Then the foam padded sleeve slides
down a little farther between the lens hood and the barrel.
This provides a "filler" for the gap between the large
diameter reversed hood and the barrel of the lens.
At
left above is the other sleeve I made to cover the hood.
Since I'm using a LensCoat Hoodie for my lens cap, I didn't
need padding in the "cap" end of this hood sleeve,
just padding around the sides to protect the hood from
scratches and nicks. This sleeve is slit half way just
like the barrel sleeve. It velcro's onto the hood as shown
in the photos below.
With
both sleeves in place, the whole thing is slipped into
the backpack along with another padded insert that I made
for my smaller lens. With this setup, I can carry the
500mm, a 300mm with TC attached, a 70-200mm with body
attached, and a second body in a padded pouch, plus other
items (wide angle lens, another TC, extension tubes, etc.).
Since the Kelty backpack is a good 6 pounds lighter than
the Lowepro Vertex I have, it makes a considerabe weight
difference carrying the lenses this way.
 |
Another
angle of the lens with
both sleeves, ready to pack. |
At
right are three photos showing both the hood sleeve and
barrel sleeve on the lens, then with the hood sleeve velcroed
tight, and finally the whole thing stuffed into the Kelty
backpack along with a 300mm lens. At left is one last
photo of the lens with both sleeves on. Additional uses
for these padded sleeves could be to cover the lens in
the field, providing not only a water resistant cover
for rain sprinkles, but padding to protect against bumps
and scratches when carrying it around on the tripod. Last
but not least, I now have a protective covering that I
can use to slip the 500mm into a drybag and transport
it in my kayak without fear of banging it up.
|
| |
|
|
 |
|
 |


