|
|
|
|

Super-telephoto Lens Jacket for under $10
|
It
seems half my projects involve making something for my
500mm lens. What can I say? It was a major investment
and I do my best to baby it. This project is for something
I've been grousing about for a long time, and finally
decided to do something about it. I think 90% of the photographers
I see with super-telephotos have a Lenscoat neoprene sleeve
on their big glass. Everytime I looked at getting a Lenscoat
for mine I ran up against that wall that separates my
wants from my wallet. Am I REALLY going to pay $100 for
$5 worth of neoprene?" Everytime I ask myself that
the answer is a resounding "Ain't gonna happen."
For crying out loud, my neoprene calf-length kayaking
boots cost less than that, and I know they are a lot more
difficult to make than simple neoprene rings. And, if
they ever leak, the manufacturer replaces them for free
(including shipping both ways). Next to that the Lenscoat
pricing seems seriously out of touch with reality.
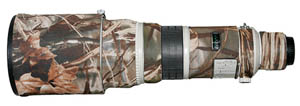
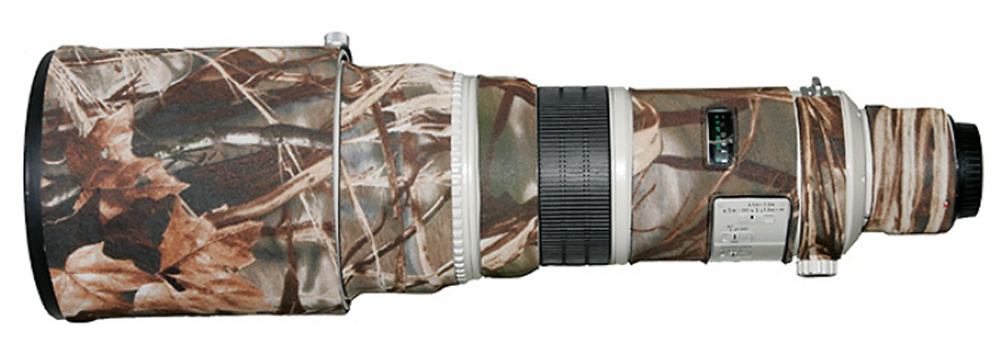
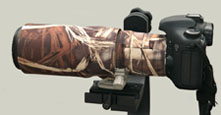
Lenscoat
on Canon 500mm - $100 |
|
 |
|
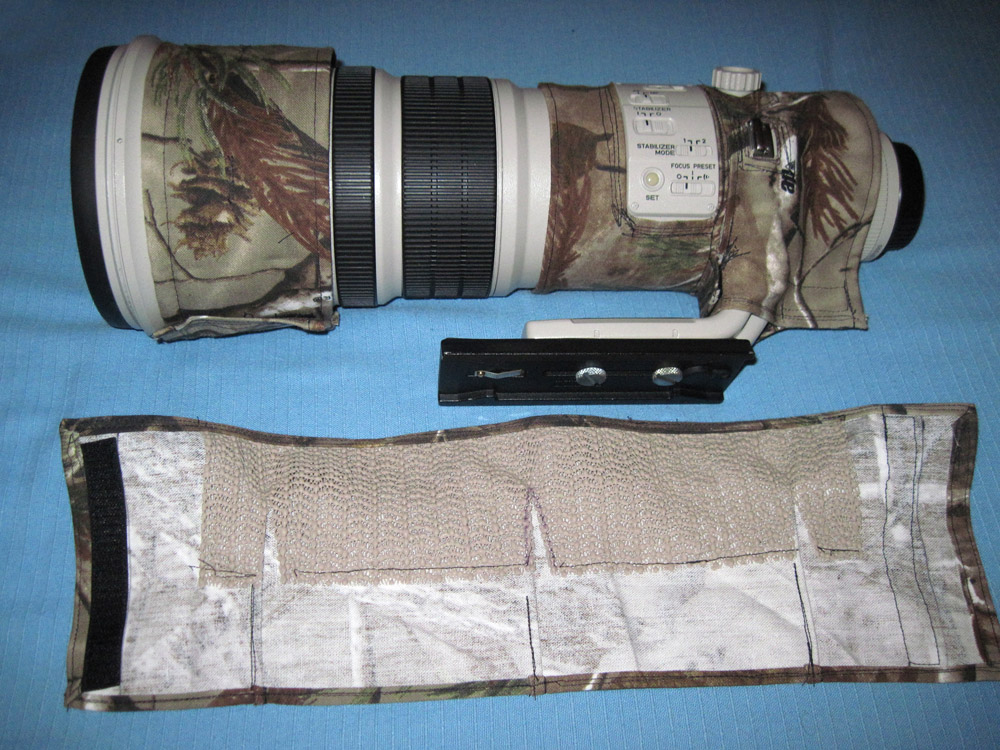
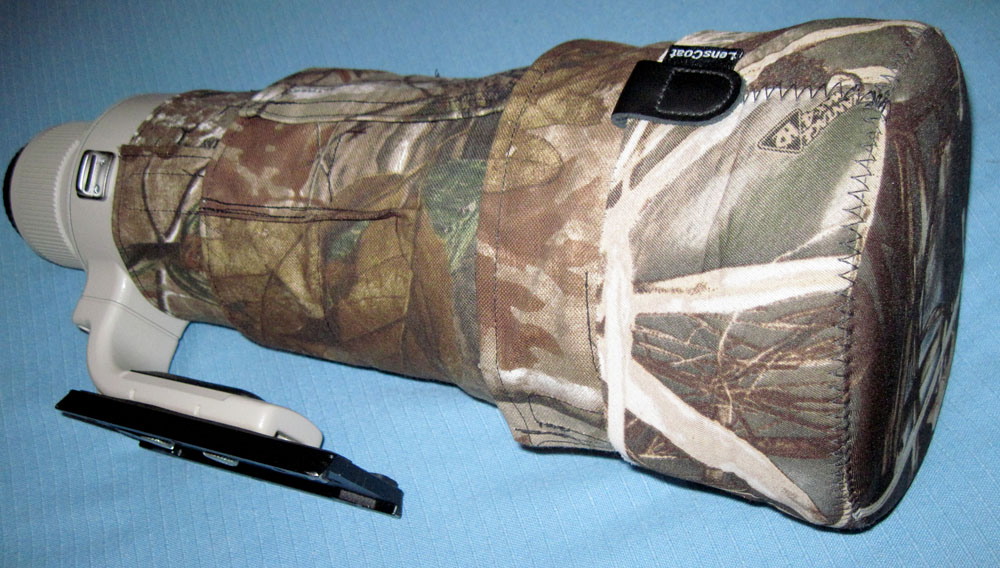
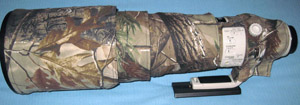
| Completed
homemade lens sleeve - $10 |
|
Besides
the outrageous price (an issue that runs rampant in the
"professional" photographic equipment market),
the fabric laminated to the neoprene soon gets frayed
along the edges and begins looking rather ratty. You'd
think for $100 it would hold up much better than that.
In addition, it doesn't even cover the whole lens. It
looks more like a makeshift patchwork. On all levels it
just didn't appeal to me. If it was maybe 20 bucks a pop,
it might be practical to change it out now and then when
it got worn. Maybe if you got a 5-pack for $100 and had
spares it would be easier to justify.
 |
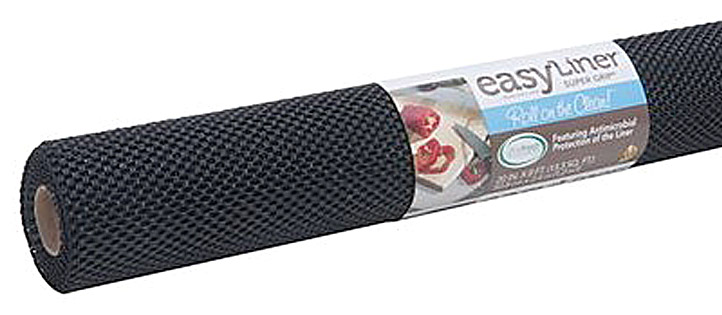
Example
of soft foamy
rubber
shelf liner |
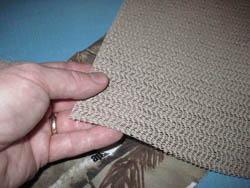 |
| The
tan shelf liner I used |
Sadly
neither of those ideas is a reality, so I put my thinking
cap on and did what I often do.... I designed and made
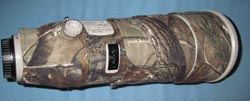
my own version. At the left is the Lenscoat
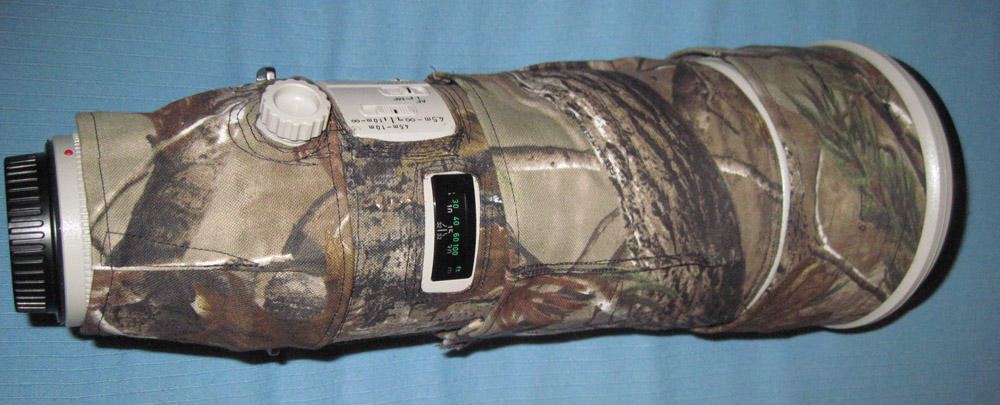
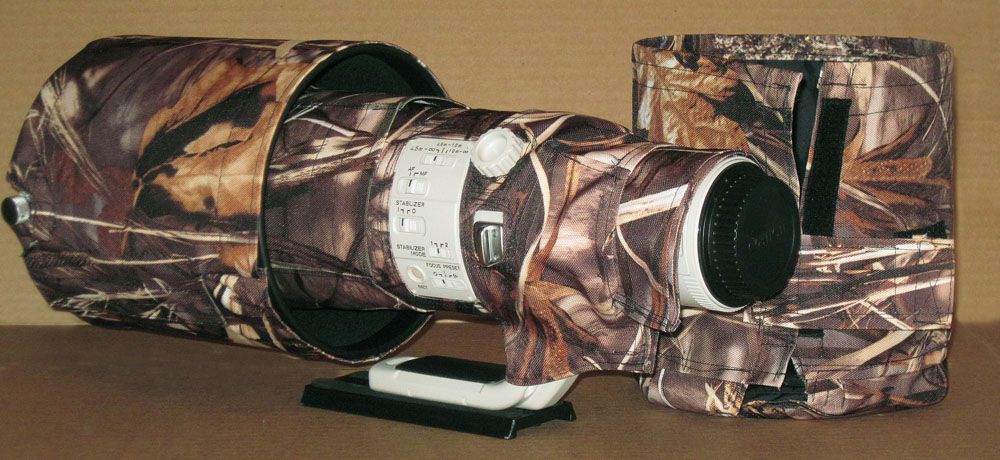
official product image of a Canon 500mm with their
neoprene sleeve. Below that is my 500mm with the homemade
lens sleeve I created for less than $10. It was ridiculously
easy to make (compared to many of my projects) and it
covers the whole lens (no gaps). It's easier to put on
and remove than the neoprene rings. It can easily be made
water repellant with some waterproofing spray, which I
already have and use on other items.
If
you stop to think about it, the lens sections are simply
rectangles of various sizes rolled up into cylinders.
That means making them is very simple. Just measure the
circumference and length of each section, add some extra
around the edges for folding neat hems, and add an inch
or so extra length on one end to overlap for velcro fastening.
For my 500mm I bought a half yard of camo material (60
inch width x 18 inches) for $7, which provided more than
enough material. I already had 3/4-inch velcro on hand,
as well as a leftover piece of soft foamy rubber kitchen
shelf and drawer liner (grocery store or Walmart housewares
section) to go on the underside to provide an excellent
grip on the lens. This keeps the sleeve from sliding or
spinning on the lens barrel the same way neoprene grips
the lens snugly. But because the material is holding this
liner onto the lens, it won't stretch and get loose like
neoprene does.
Since
your lens is likely to be a different size and brand,
and may have more or fewer sections than mine, I won't
confuse you with exact measurements. This is about the
process, and not about a specific lens. You can adapt
my technique to your own needs, and maybe come up with
a lens sleeve even better than mine. I recommend starting
with the lens hood first, as it should be the largest
and simplest section to make. What you learn from making
it will be excellent practice for the rest of the sections,
which will surely all be different sizes.

|
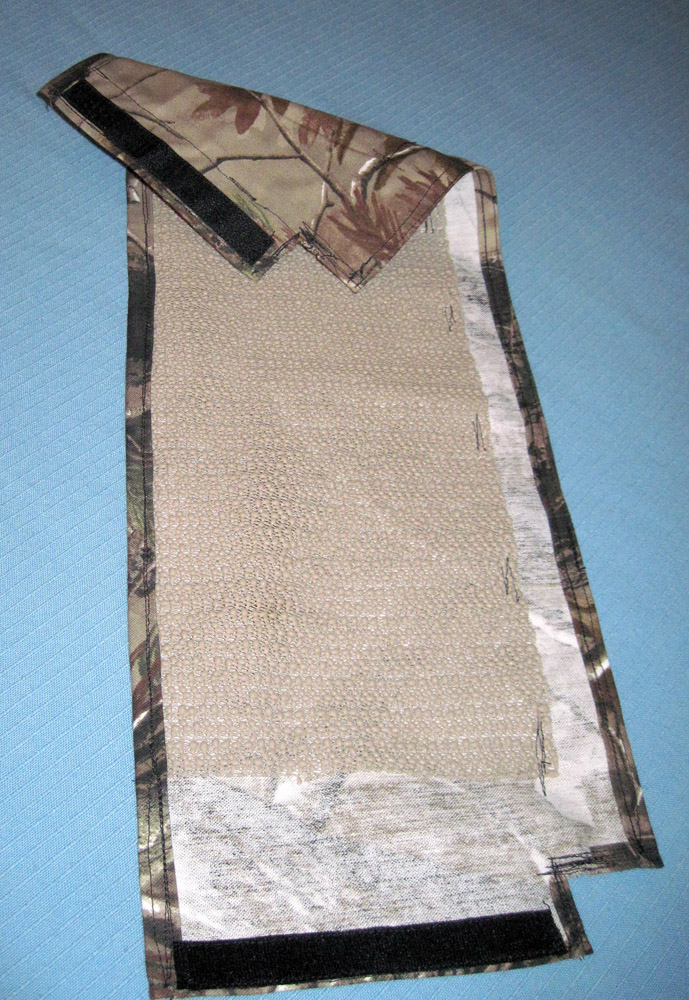
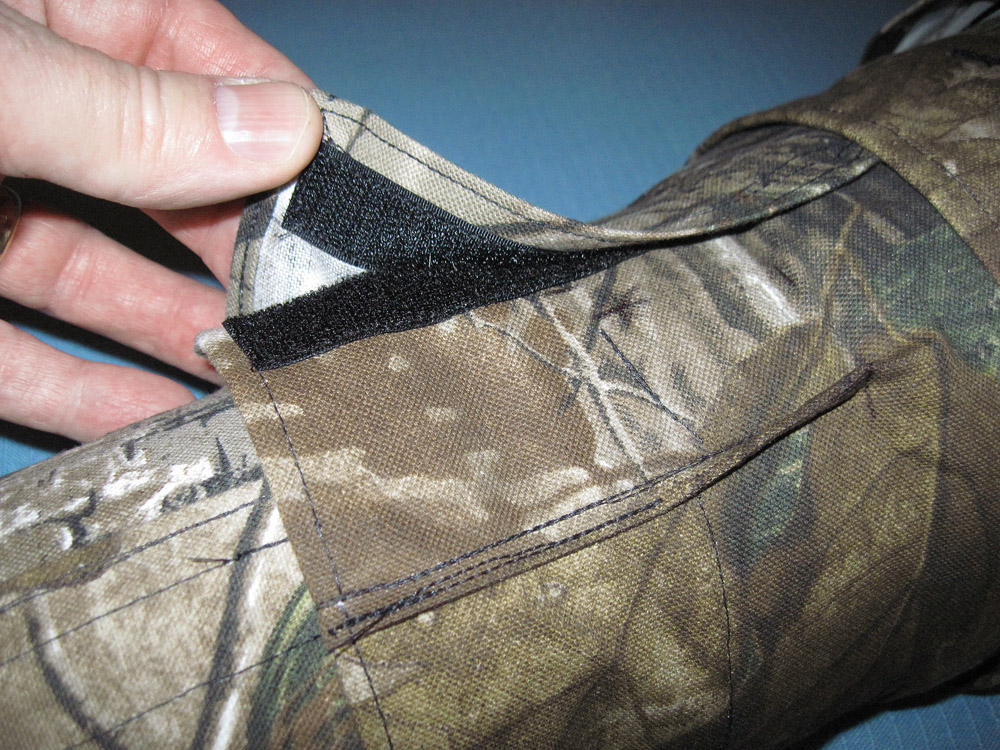
Inside
of hood cover showing
rubbery shelf liner piece (tan)
sewn under front edge hem.
|
Basic Steps:
 |
| Hem
and shelf liner insert |
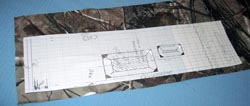 |
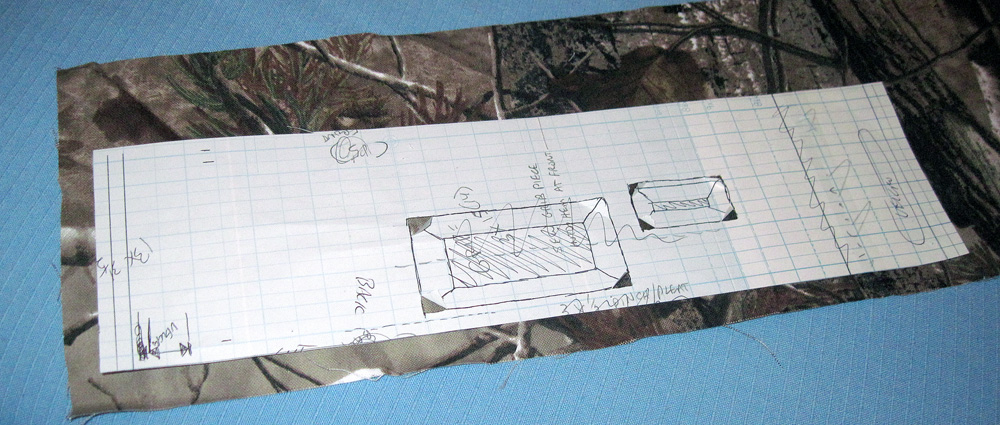
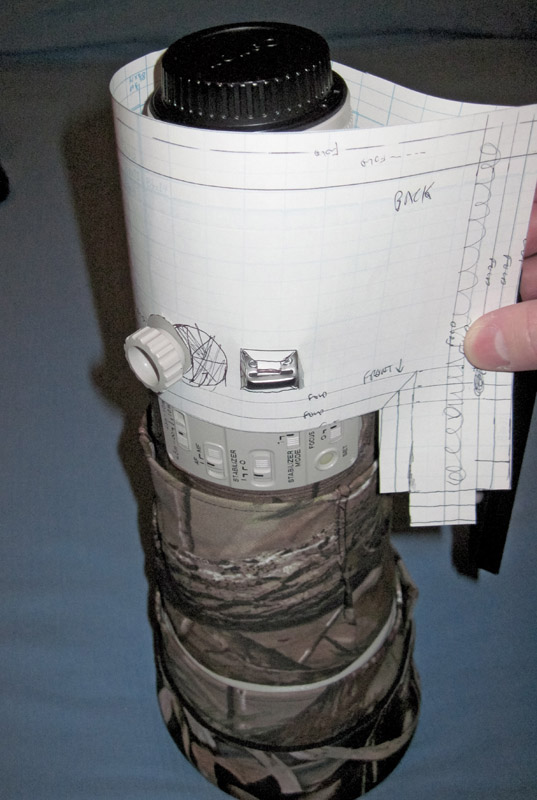
Paper
pattern, scribbles and all,
with corner cuts to mark panel
cutouts on material |
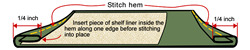
1 - Measure the length
and circumferance of the lens hood (or lens section).
Add 1 inch to the length to allow for overlap for the
velcro closure. In addition, add 1/2 inch to all four
sides for hem. Draw this rectangle on a piece of paper
to make
a pattern (example- a large hood with an 8" x 20"
measurement would become 9" x 22").
2 - Pin this paper
pattern to your material, then cut out the material exactly
along the edge of the paper pattern. Once cut, remove
the pins and paper pattern.
3 - Fold over 1/4
inch on one edge, then fold that 1/4 inch fold over itself
again as seen
in the above diagram. This seals the cut edge inside
a hem so it cannot fray. Stitch along the hem. Then do
this with the other three edges. NOTE: On some
sections, like the hood, you will need to insert the shelf
liner piece inside the hem before stitching that hem.
For my application I did this to the front
edge of the hood, and front edge of the first and
second
lens sections. The third lens section and back section
did not require this.
4 - Now sew the hook
and loop pieces of velcro to opposite ends of the rectangle
where it overlaps into a cylinder. Before sewing, fit
and test the material section on the hood or lens to be
sure you locate
the velcro pieces exactly so they line-up over each
other for a snug fit.
---------- That's it for the basic steps. ----------
Important Modifications To The Basic Steps:
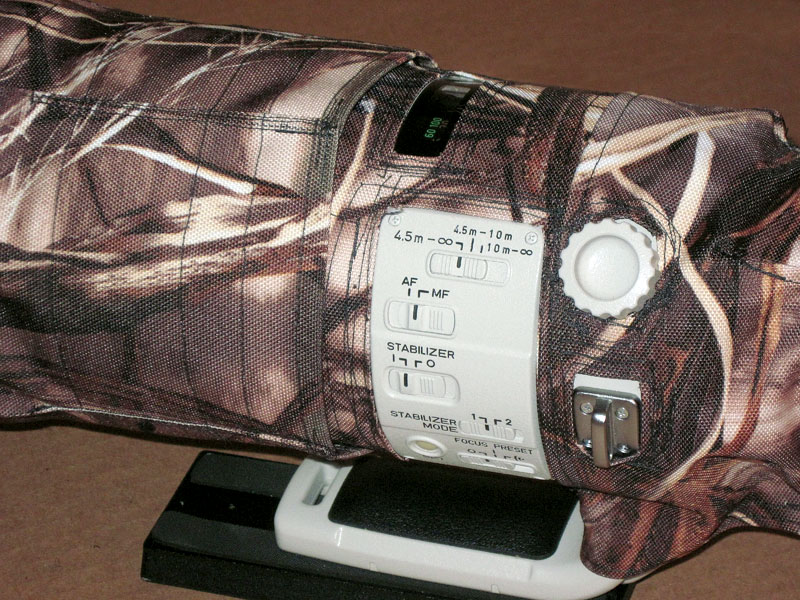
 |
Inside
of 2nd section cover (focus ring)
showing rubbery shelf liner (tan) seamed
under the hem. Notches in the tan liner
correspond to the taper pleats. |
You
will likely need to modify these basic steps for various
sections, depending on where your buttons, dials, strap
rings, lens foot and controls are located. For example:
 |
Cutouts
for ring knob, focus scale
and control panel |
Hood
cover
notch for
clamp
knob |
|
|

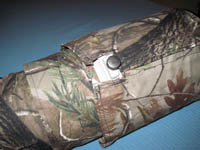
Hood
cover overlaps over 1st section. |
 |
My
Lenscoat hoodie blends well
with the homemade covers.
|
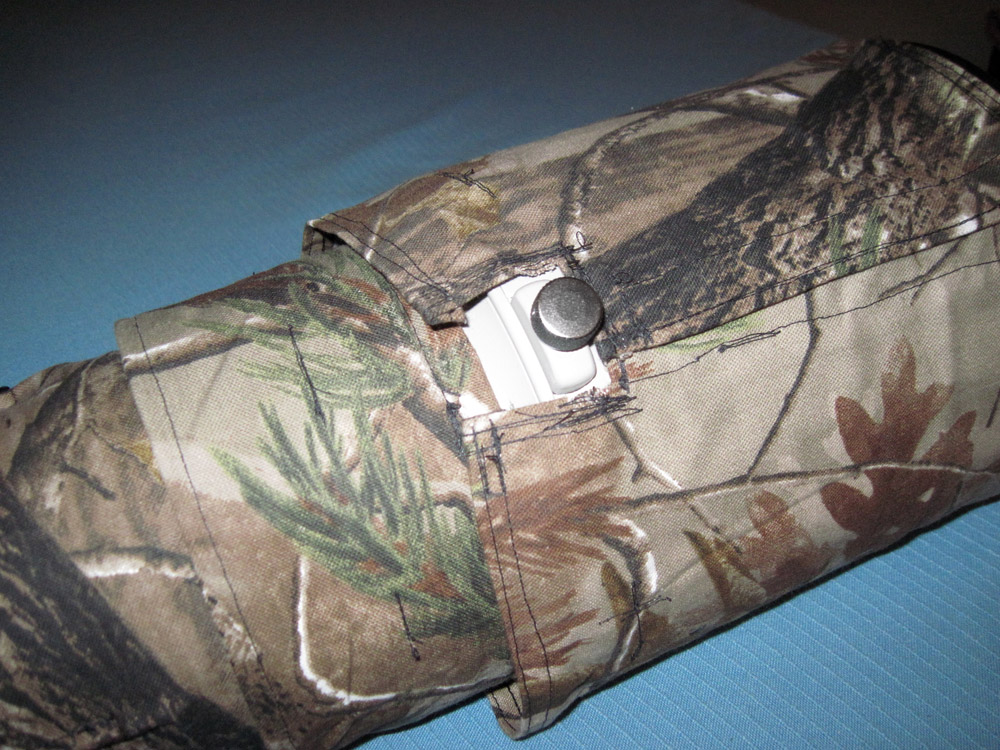
Notches and Holes -
I had to cut out a notch
for the hood clamp knob before sewing the hems for
the hood cover. My third lens section had the stabilization
controls and focus dial, for which I made cutouts
and then hemmed the cutout edges.
Tapering Pleats -
My second section (focus ring) was smaller at the back
end than front end, so I put three pleats
in it to taper the diameter down on the back end.
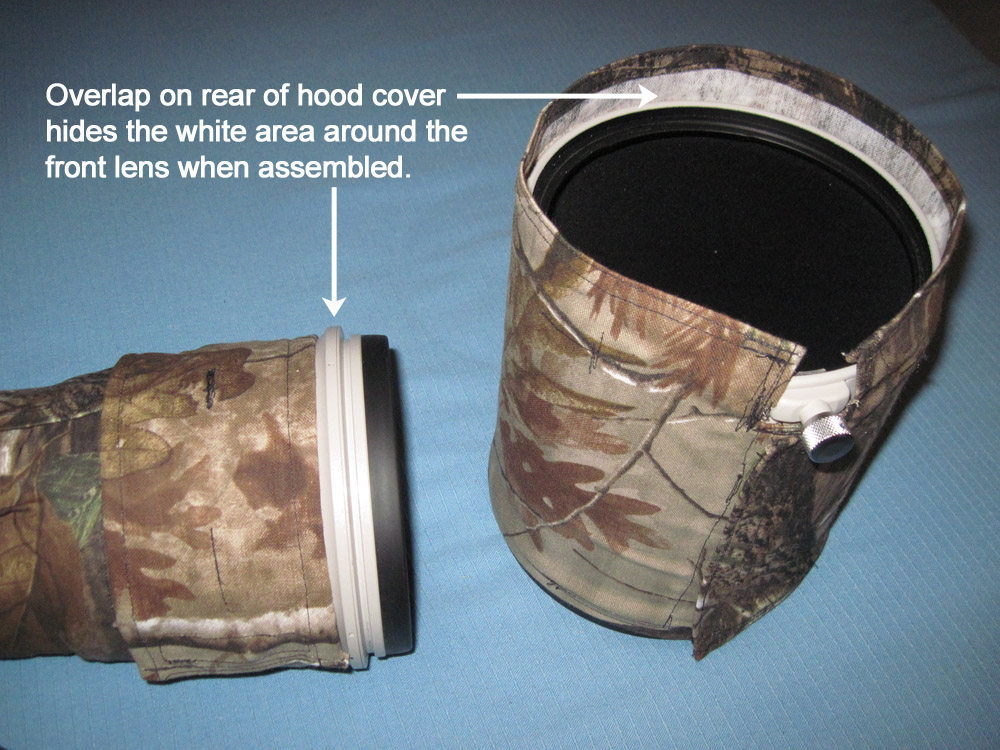
Overlap - The hood,
1st and 2nd sections all were made a little longer than
the section measurement so they would overlap on the back
side to cover any gap between sections. This was practical
because these sections were larger around than the section
behind them. This can be easily
seen on the completed sleeve. Another example is the
overlap
on the hood cover.
Test Fit Your Paper Patterns
- To avoid making mistakes, take the time to verify
your fit with your paper patterns, especially when
it comes to cutting out access holes.
 |
|
2nd
section (focus ring) showing
pleat and velcro closure |
Test
fitting the paper
pattern for the lens
mounting ring cover.
|
Such modifications will obviously vary from lens to lens,
and section to section.
About the shelf liner -
I
wanted to add some comments about why and where you should
use the shelf liner (or similar material). Cloth material
may be a little slippery, even over a knurled rubber grip
ring, and the soft rubber (or maybe it's vinyl ??) of
the shelf liner provides the very same sort of grip as
the neoprene of the Lenscoat. Since these covers are attached
by wrapping and connecting the ends with velcro, how tightly
they fit depends on you pulling them snug before pressing
the velcro together. This shelf liner gives additional
grip, even if you don't put the covers on quite as tightly
as you should. Also, it provides some additional cushioning
(i.e. protection).
1- I used it on the
hood cover for the additional grip it provided on the
slick hood surface.
2- For the 1st section,
even though it had a rubber knurled ring there, I used
it because the lens tapered quite a bit. I wanted it to
grip tightly on the large end of the taper, but be loose
on the small end of the taper so it would not rub on the
focus ring section, since that needs to spin.
3- In particular,
this should be on the cover section for your focus ring.
Obviously you want the best grip there.
4- The 4th section
(control panel and focus dial) didn't need any liner since
the cutout for the control panel fit around the raised
panel. That alone would help keep it in position, plus
it couldn't slide backwards because of the mounting ring.
5- The 5th section
(mounting ring) needed none. It velcro's around the lens
foot, which does not allow for any slippage or movement
anyway.
 |
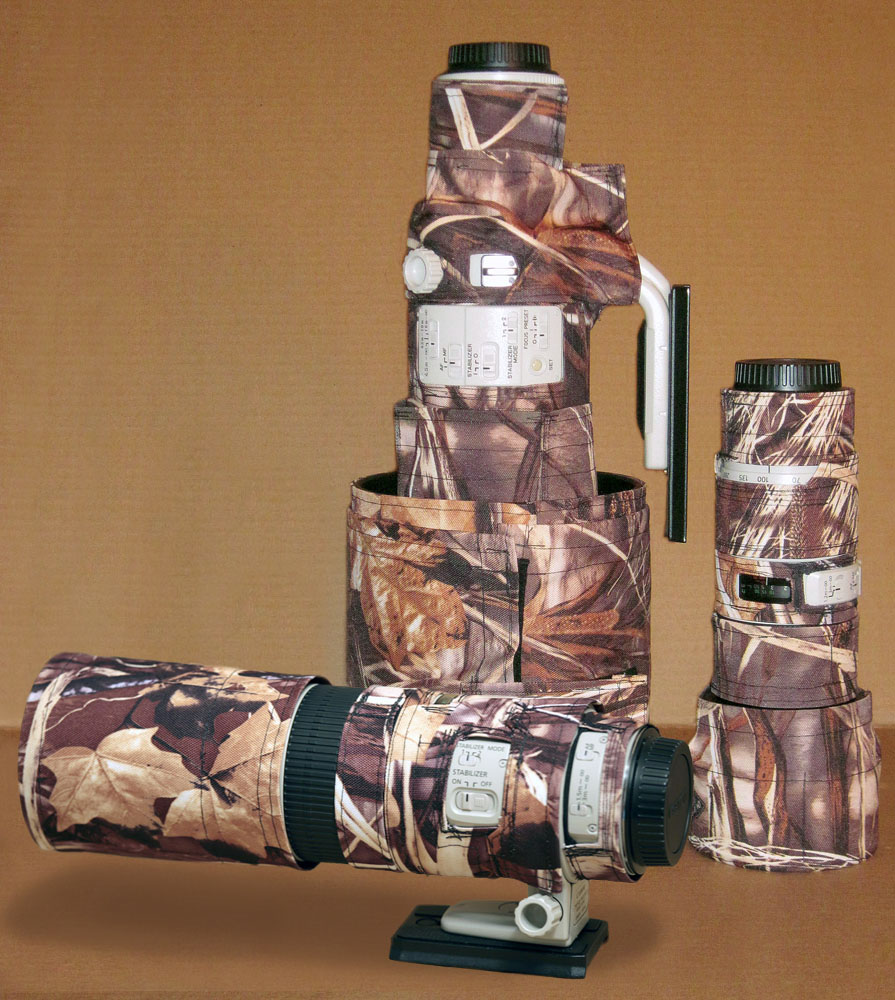
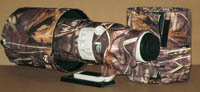
Left
to right- 300mm,
500mm, & 70-200mm |
So,
where you use the shelf liner in this project depends
on your decisions when fitting a cover for your particilar
lens. Put on your thinking cap and it should be pretty
obvious the best spots to choose. That's pretty much the
whole story. I thought this project was going to be far
more tedious and difficult than it turned out to be. Just
keep in mind that the fit needs to be as close to exact
as you can manage. Careful measurements are important.
Properly hemmed, it's not going to fray like the neoprene
does, and should look good for a long time. Don't forget
the waterproofing spray if you want that protection from
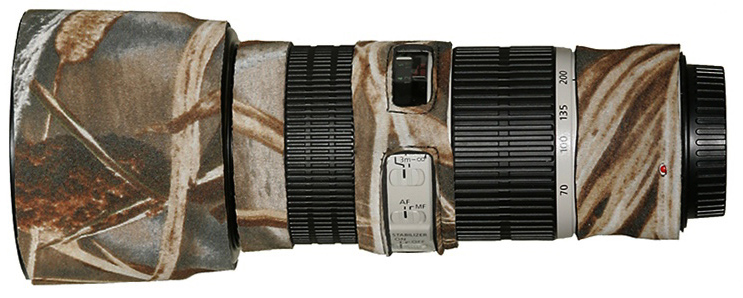
sprinkles.
| UPDATED 500mm
Cover, and Three
New Covers: |
Not
long after making that first cloth cover I came across
some 600 denier waterproof material in my favorite camo
pattern - Realtree Advantage Max-4 HD (now called Realtree
Max4). I made a few items with this material, and soon
decided to make some lens covers too. I was feeling more
confident now that I might actually be able to make covers
for my smaller 300mm f/4 and 70-200mm f/4 lenses. I knew
the smaller tolerances could be tricky, but the new material
was easier to work with than the previous cotton material,
so I thought I could manage it.
 |
| Detail
of 500mm cover |
 |
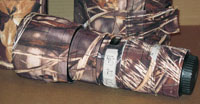
 |
500mm
& teleconverter cover
with matching hood cover |
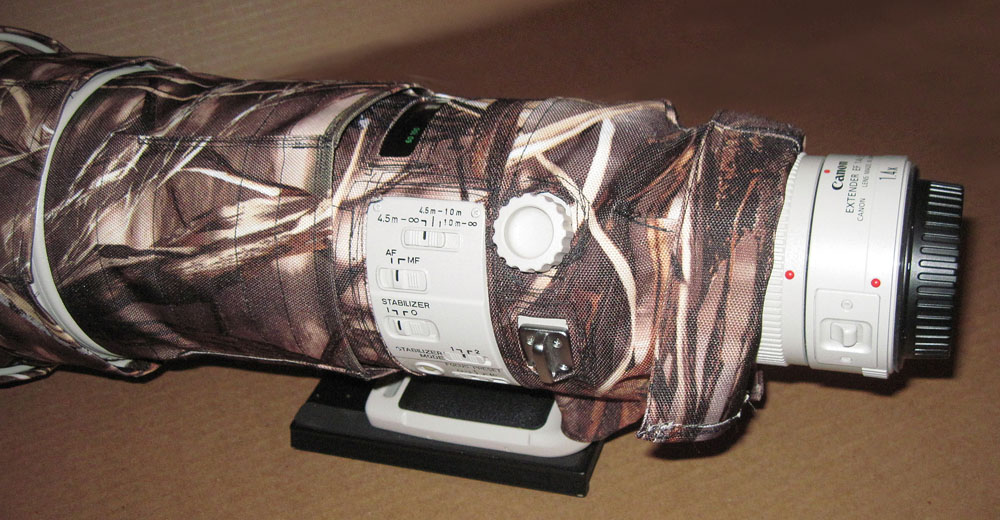
Teleconverter
"flap" rolled up |
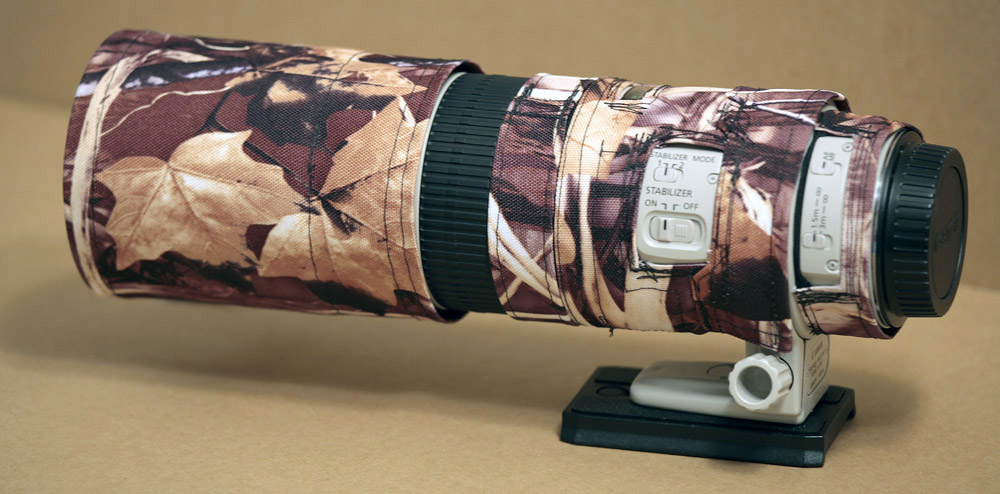
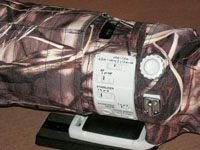
First
I tackled the 500mm cover. This time I also made a hard-front
hood cover similar to the original leather hood cover
that came with the lens. Now everything matches and is
camo. The protective front is made from a plastic coffee
container lid sandwiched to a disk of 1/8-inch thick plywood
(strong and very lightweight). The inside is lined with
black ripstop nylon over foam padding to protect my expensive
glass. On this go-round I added a flap to the rear of
the cover that hides the 1.4x TC that I often use with
this lens. The flap simply rolls over so it's not in the
way whenever I'm not using the TC. I may return to this
project and make individual covers for the teleconverters,
but at this point I don't see a need. At right is a detail
shot of the 500mm cover. The stitching would be less
obvious had I used a brown thread.
 |
 |
| 300mm
(hood retracted) |
70-200mm
cover |
 |
 |
For
comparison, here are the Lenscoat
300mm & 70-200mm covers |
 |
| 300mm
cover (hood extended) |
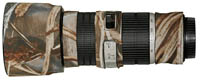
Next
came the 300mm cover. The integral hood on this lens required
a slightly different approach. The hood simply slides
back over the black rubber grip of the focus ring with
no space between. There was absolutely no way to squeeze
a cover on the focus ring and under the hood - at least
not the front half of the focus ring anyway. All I could
do here was put a slim cover on the rear half of the focus
ring.
Another
challenge with these smaller lenses is the scale. There
is only a 1/4-inch gap between the tripod mount ring and
the IS switch panel, and an 1/8-inch gap between the ring
and the focus switch panel. This was not sufficient for
a rolled hem. I came up with the idea of using tightly
stretched 1/4-inch black elastic for these gaps, and it
works great. The elastic even rolls up to fit into the
1/8-inch gap easily.
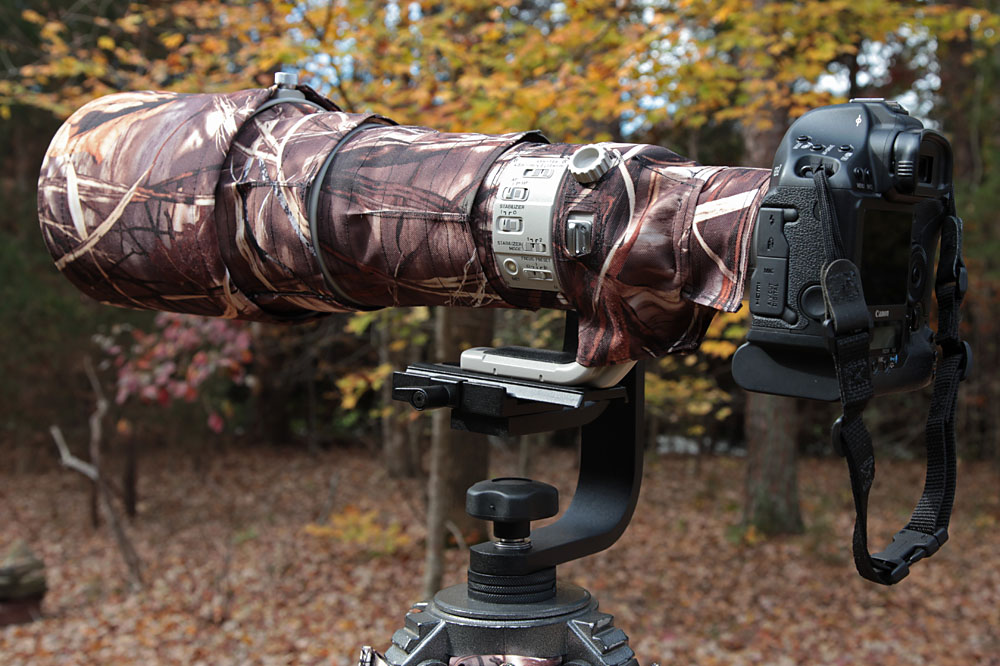
 |
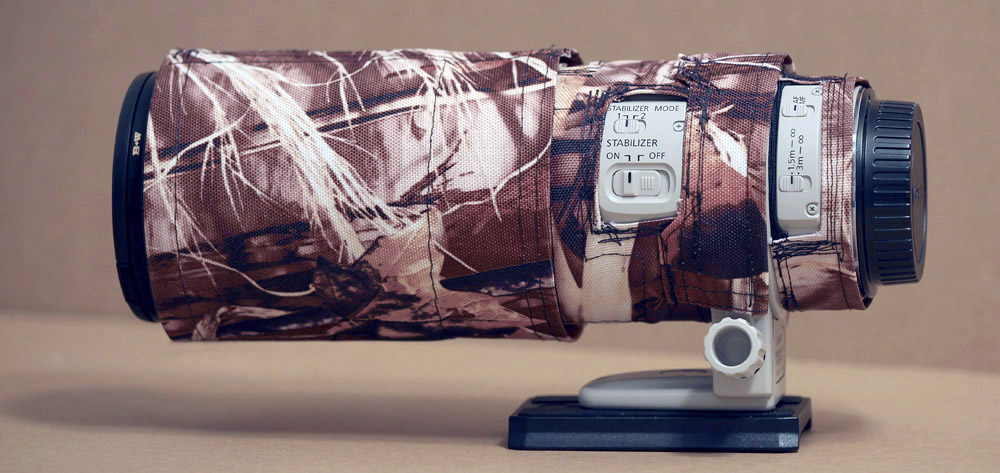
| 500mm
on tripod |
Last
but not least is the 70-200mm cover, which had it's own
challenge. The hood was tapered and required a very snug
fit so the "rubber" (shelf liner material) on the underside
would hold it tightly in place. Unlike the 500mm covers,
neither of these smaller lens covers have any velcro at
all. The covers are completely "slip on", since the thickness
added by material overlap and velcro on these smaller
lenses would have made the covers less aesthetically pleasing
and actually more difficult to make. Lucky for me the
600 denier polyester I used had a slight stretch to it,
perhaps 2% stretch, which was just enough to wiggle these
tightly-fit cover sections on over the control panel bump-outs,
yet keep them snug once in place.
 |
 |
| 400mm
with hood retracted |
400mm with hood extended |
Not
long after completing these covers, I added a Canon 400mm
f/5.6 L to my lens lineup. The first thing I did was make
a matching cover for it too. This 400mm is very similar
in size to the 300mm, with the same built-in sliding hood.
It has no image stabilization like the 300mm (so no "IS"
control panel to contend with), and the tripod mounting
ring hinges open for removal instead of sliding off the
back of the lens. Despite these differences, making the
cover was quite similar to the one for the 300mm. At right
are photos of the 400mm cover with the hood in both positions
for comparison.
So,
for one yard of material - enough to do all four lenses
and lens hoodie - I spent less than $15.00 (including
shipping). That's only 3% of the $445.00 that
four Lenscoat covers, TC covers and a 500mm hoodie would
have cost. Not only that, but mine look better, cover
more of the lens, and are just as waterproof. I think
I am very happy. |
| |
|
|
 |
|
 |