 |
|
|
|

Ground Pod mount for the
Flying Saucer Ball Head
|
The
Flying Saucer Ball Head |
I use my homemade "Flying Saucer
Ball Head" mostly on my bean bags to give my lens the
smooth panning motion I want. It's far superiour to fighting
with the lens foot twisting up in the bean bag when I
try to pan. If you haven't seen the "Flying Saucer" yet,
check it out here
in my article.
For
quite some time I've wished I could manage the expense
of a ground pod for when I'm shooting shorebirds with
my 500mm f/4. However, I just could not get past that
wall consisting of a $100 plastic pan, plus another several
hundred dollars for another gimbal head and clamp. And
I certainly wasn't going to fiddle with swapping my gimbal
head back and forth between the tripod and any sort of
ground pod "pan", whether bought or homemade. Even if
I made a ground pod from an old frying pan, there is still
the huge expense of another gimbal head, so the ground pod has eluded me until now.

|
| The
template |

|
 |
Plywood
blanks
screwed together |
Two
"cradle" arms cut out |
The
other day I had an epiphany ..... an idea how to use my
Flying Saucer Ball Head with a ground pod. After some
thought and doodling, and the wife's donation of an old
aluminum frying pan she could no longer use because the
non-stick coating was flaking off, I had what I needed
for this project. The pan was perfect.... just the right
shape so it will glide easily, plus it was sturdy enough
and large enough.
I
started by cutting out two paper templates. One fit the
shape of the ball head bottom, and one fit the inside
shape of the pan. Then I lined these up, adjusting for
a good height and taped them together. I doodled some
ideas and notes on the template, some of which I ended
up using, and some not. This template would become two
arms crossed in an "X" to "cradle" the Flying Saucer Ball
Head, in essence a very simple concept. I took two pieces
of 5/8" plywood salvaged from an old shelf I no longer
needed and screwed them back to back. Then I traced the
template onto the plywood and cut it out with a jigsaw.
This gave me two matching pieces. After removing the two
screws that held them together, I cut out a notch in each
so they would interconnect, crossing in an "X"
pattern shown below left. The cradle arms are attached
to the pan by wood screws through the sides of the pan.
This method avoids any bumps on the bottom of the pan
from screws or bolt heads, which is an issue if using
a gimbal head on a pan to make a ground pod.

|
 |
| Rough
cradle arms assembled |
Cradle
arms with tabs added |

|
| Inserting
the ball head |
Next
I cut some "tabs" from thin vinyl. You could use a scrap
of vinyl siding for a house, the side of a very heavy
empty plastic jug, or some other material. I used pieces
cut from a scrap piece of vinyl leaf screen from my gutters.
Both vinyl and polypropylene plastics have a "slippery"
kind of surface that does well when used as glides. It
needs enough thickness in this application to make "tabs"
stiff enough to hold in the ball head while making it
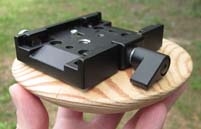
easy for the wood to glide when panning. I screwed three
of these tabs right onto the cradle arms. I made a fourth
tab attached with a bolt and wing nut so I could loosen
it and turn it to one side, allowing me to insert the
ball head easily (shown in right image).
I
decided to cut away excess wood from the cradle arms with
a jigsaw in order to remove a little weight (and admittedly
add some stylish shape to the design). Then I stapled
on some "slippery" glides cut from the sides of a plastic
milk jug. This avoids having the wooden ball head rubbing
the wooden cradle arms, allowing the ball head to rotate
more smoothly. To accomodate the additional height caused
by the glides I used additional pieces of vinyl to shim
each of the tabs, raising them a tiny bit. Also note how
I used a dab of latex caulking on the bolt tip (you could
also use silicone) to keep the wing nut from accidently
unscrewing all the way off and getting lost. This tab
has a second tab layer on top of a slightly thicker piece
of vinyl to stiffen the pressure of the wing nut against
the tab tip. All these tabs proved strong enough that
I can lift the whole ground pod by the ball head if necessary.
Finally, I sprayed the completed project with a bit of
camo paint colors that I had on hand. This keeps it from
looking quite so crude, and serves to dull down the shiny
surfaces.
 |
 |
 |
 |
 |
| Cutouts
minimize weight |
Detail
of bolted tab |
Detail
of screwed tab |
The
completed ground pod |
With
lens & camera mounted |
I
completed this project for exactly zero dollars by utilizing
a defunct frying pan slated to be thrown out, salvaged
pieces of plywood and other assorted scraps of material,
plus screws and a bolt and paint I already had. It doesn't
have the tilt range of a ground pod and gimbal costing
$400-$700, but then I don't foresee the need for much
tilt when I'm lying on the ground photographing small
subjects also on the ground, which is my sole intended
purpose for it. For anything else I would use a low tripod
anyway. I still have use of my Flying Saucer Ball Head
on a bean bag, yet in ten seconds or less I can insert
it into the ground pod for those cool low angle ground
shots.
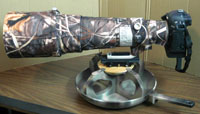
The
last image at right above shows the 500mm and 1D Mark
IV attached to the ground pod, ready for use. I can't
say it's as elegant as a good gimbal, but the price is
certainly right. For the infrequent occasions where I
have need for a ground pod, it will serve my needs. Of
course, when I hit the lottery, I'll go out and get another
gimbal and bolt it to the same pan. In the meantime, this
will do nicely.
|
| |
|
|
 |
|
 |


