|
|
|
|

Boat
or Kayak Camouflage Cover -
Redesigned
|
When
I returned from the Merchants Mill pond trip, I resolved
to redesign the camouflage cover. After some thought,
I came up with what I feel is an even simpler cover frame
and a much more practical design. It eliminates the problem
of a wet cover dripping into the boat, gives easier access
to the front of the cockpit, and makes loading equipment
and myself even simpler. It will
also make it far easier to simply paddle the boat, on
those occasions when the trolling motor is not practical. I've
even added a simple way to attach branches and other natural
camouflage to the boat.
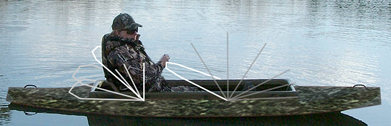 |
The
new concept - two simple hinged u-shaped
bars of pvc pipe
that fold up and down, like a convertible car top.
(click to enlarge)
|
To
the right below are four diagrams. In diagram "1" the
turquoise lines show the basic pvc box frame which I retained
from the first cover design and reused here. The little
stubs sticking out around it represent short pvc pipes
that I added for attaching tufts of weeds and other natural
camouflage material, which I show later. The diagram also
indicates two handles I added so I have something to grab
onto when sitting down and getting up from the seat, which
is flat against the bottom of the boat.
 1 1 |
 3 3 |
 2 2
|
 4 4 |
| click
diagrams to enlarge |
In
diagram "2" at right the red lines represent the "u-shaped"
sections of pvc pipe which hinge to move the front and
rear covers up or down. The yellow lines show the down
positions. The white "L's" are the hinges.
 |
My
conceptual illustration of how the newly
designed cover would look (includes motor cover).
(click to enlarge) |
In
diagram "3" the white lines show the pattern for the nylon
cord used to hold the front hinged frame in place when
in the up position. The cord goes slack when the frame
is hinged down, but when it comes up the cord pulls taught
as the frame reaches the proper position. The cord also
serves as a support for the material covering the front
so it doesn't droop down into the cockpit. The front points
of the cord loop or tie to the eye hooks at the front
corners of the cockpit (see
this photo). The rear points of the cord hook
into the uprights of the rear frame by a small "S"
hook, and hold the front frame taught in the upright position
(see
this photo).
In
diagram "4" right above, the cream colored lines
show the cord pattern for the rear frame. The line stretching
forward on each side hooks into an "eye hook" to hold
the rear frame up in position. Unhooking the two lines
lets the frame hinge back and drop down.
 |
| Hinges
made from two "L" brackets |
I
was able to reuse much of the PVC pipe, pvc joints and
material from the first cover on the new frame construction
(because I used screws to secure the joints originally
instead of PVC cement). The hinges were made using "L"
brackets as shown in the diagram at left and the photos
below right.
In
the right bottom photo you can see how I used short pieces
of the foam insulation made for water pipe to pad around
the hinges. This insures the metal never rubs on the boat
fiberglass, and protects me from cuts and bumps on the
sharp end of a bolt or hinge corner when handling the
boat. Note the wooden dowel visible inside the pipe in
the right bottom photo. I used a 2-inch long section of
oak dowel, shaved down to just fit snuggly inside the
pipe, to reinforce where the hinge bolt goes through.
This prevents squeezing the pipe out of shape when snugging
up the nut and bolt. I recommend using a small washer
between the pipe and the "L" bracket to insure
it hinges smoothly.
I
no longer need the small bungee cords on each side to
hold the frame onto the boat. The base rectangle of the
frame is now held in place in the rear by the headrest
bracket, and in the front by two small pieces of oak at
the front corners (see left photo). I used the eye hook
bolt to hold the oak pieces in place. To remove the frame,
I only need to loosen the nut on the eye hook at each
front corner and turn the oak pieces to one side so the
frame will lift up and slide back from under the headrest
brackets.
The
camouflage material is attached very simply. It's tied
to the frame every foot or so with pieces of camo-color
nylon cord, the same cord used for the frame
supports. This is visible in the lower right of
this
photo. The photo also shows how the cord from
the rear frame hooks into the small eye hook to hold it
in the upright position as
mentioned earlier. The handles I added (mentioned
earlier) are visible in this photo as well.
The
left photo here shows two of the short pieces of PVC pipe
(I called them "stubs" earlier) which are located in strategic
places around the base frame. This is where I can attach
pieces of natural camouflage material. The lower left
photo shows three more of these "stubs" at the front of
the boat.
A
sample of what I mean by natural camouflage material is
shown in the photo
at right. I bundled some dried Pampas grass and
stuffed it into a short piece of 1/2-inch PVC pipe for
demonstration purposes. This one is obviously not finished
off. When finished, the grass would have more material
around the base to hide the bottom and give it a more
natural appearance. You can pre-make a few pieces to carry
with you, such as short dead brush limbs with spanish
moss draped over them, or perhaps short brush limbs with
leaves still present. Just shove them down into the pipe
for a tight fit.
This
method allows you the flexibility to add local vegetation
from wherever you are photographing so you can blend into
your current surroundings. The pipe stubs do not need
to be screwed or glued in, as they are sufficiently snug
enough to stay put. This permits turning the elbows on
the stubs to hold the material at the desired angle. The
stubs fit into "T" fittings situated around the base frame,
and can be removed or added as desired.
 |
 |
 |
Fully
collapsed view - front and
rear covers are lowered. |
Rear
cover raised, front
cover hinged halfway. |
Front
and rear covers both
fully raised and hooked. |
To
the right are three photos of the completed design. It
does look a bit large sitting there in these photos without
a person in the pictures for comparison, but it really
is no larger than a 10-foot kayak.
 |
| Interior
view |
 |
 |
| Front
angle views, fully covered and fully open. |
As
you can see, with both the front and rear covers collapsed,
I should have far less wind resistance when I'm trying
to load the boat onto the trailer. Secondly, I can climb
into the boat and load my gear just as easily as when
I had the old cover design hinged up into the air. I will
no longer have the problem of it then acting as a sail
in the wind. This is a far more elegant and practical
solution. Add to that the fact that I'm no longer raising
a wet, dripping cover fringe over my head and that messy
problem is solved as well. What goes in the water now
stays in the water.
The
"interior view" photo shows the headrest. It's
a bit hard to recognize since I made a slip cover for
it from the same material as the boat. This headrest can
fold down flat over the seat by simply removing one wing
nut, as shown in the below left photo.
One
more benefit of this new design is that it seems
I have more space for my equipment inside the boat than
I had with the earlier cover frame. The photo below left
shows how well I can see under the front cover now. The
earlier frame slanted down on either side from the center
"spine", which made it difficult to see underneath the
cover, or to reach my equipment bags.
 |
Spacious
inside view
with the new cover design. |
 |
 |
The
seat & headrest
folded down. |
Two
versions of the
original frame
|
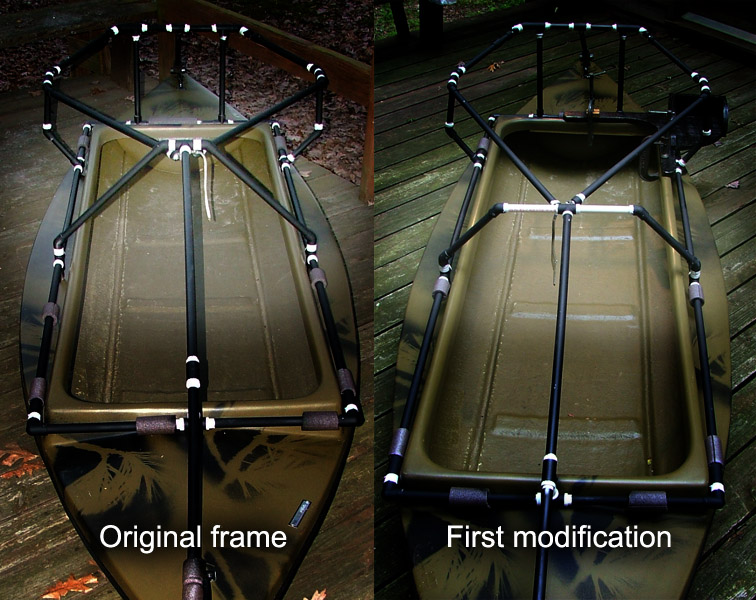
The
original frame is shown in the composite
photo at right. It came to a peak at the front
of the cockpit, which was a bit too high to easily take
photos over it. It was a simple modification to lower
the frame about six inches so I could see and photograph
over it more easily. The down side was that it became
even harder to see and reach up under the front cover.
The space inside the boat is so narrow (side to side)
that my bags had to be stored end to end between my knees.
However, the cover was so low I couldn't lift the equipment
bag in the front over the bag in the back to get to it.
This latest squared-off design gives me more room to see
under the cover and more height to access my equipment
bags much better than before. With the new design, if
I need to reach farther under the cover, I can simply
hinge the front cover up out of the way. Finally I had
a simple and practical design that could be adapted to
other boats. I hope the ideas in this article have provided
some incentive for you to try making a custom cover for
your boat.
|
| |
|
|
 |
|
 |