|
|
|

Zoom
Lens & Camera Camouflage Cover
for Wildlife Photography
|
My "starter kit" for wildlife photography was a Canon body with a 75-300mm IS lens. It wasn't a lens I could get a commercial camo cover for so I resolved to make my own. I wanted something that would truly
hide the camera and lens. None of the commercially
made lens sleeves covered the camera. I was intrigued by
the notion of figuring out how to make something that not only covered the lens, but the camera body as well, and
would really have the look of vegetation. With this first attempt at making camouflage I learned quite
a bit about how to make "leafy" elements and how well
they would work for camouflage.
FEATURES:
This
design provides true 3D blending into vegetation, completely
disquising the shape of the camera and lens. Of course,
the tell-tale "black hole" of the lens hood is there,
which is unavoidable by any means other than pure magic.
The size can be customized to work with any telephoto
zoom up to about 400mm, whether the lens hood is a separate
piece or integral to the lens body. With an integral lens
hood, the separate lens cover need not be made. Just make
the cover long enough for the body and lens both, allowing
for the fully extended zoom length. For the larger non-zoom
fixed length prime lenses, I came up with a different
solution which is described here.
This
cover weighs only a couple of ounces, is quick and easy
to put on and take off, allows easy access to all camera
and lens controls, accordions when the lens is zoomed
in and out, folds into a bundle smaller than your hand
for easy storage in a camera bag, and is very inexpensive
to make (about $3 in material). Because the lens hood
cover is not attached to the lens barrel cover, there
is no twisting of the cover if you have a lens (like mine)
where the front element rotates when focusing.
Making
one of these covers requires minimal sewing machine skills
since there are no critical tolerances, and the seaming
can show. It doesn't have to be pretty, it just has to
be functional and sturdy. I am certainly no master tailor.
My stitching wasn't straight, nor was my cutting and hemming
accurate, but it works and it won't come apart.
 |
 |
LENS
HOOD COVER:
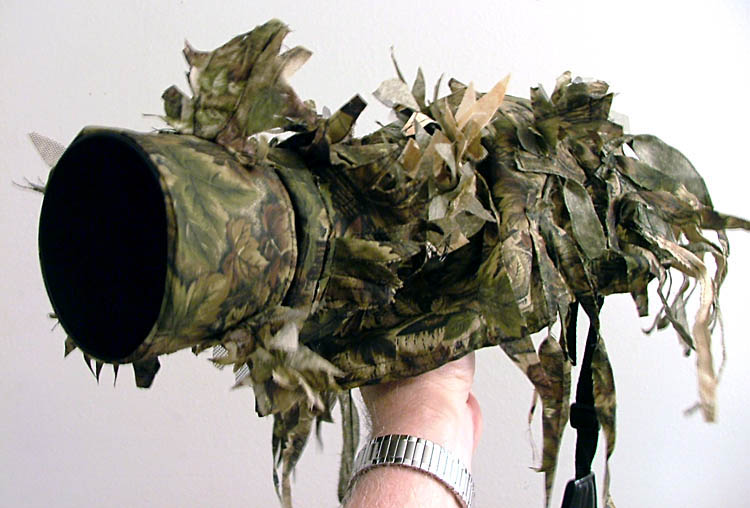
The
left
photo shows the finished lens hood cover. A piece
of cloth large enough to cover the hood with a little
extra all around for hems was hemmed along the length,
and the ends hemmed very thin just to keep the fabric
from unraveling.
The
3D pieces, like little bushes, were cut out at random
and sewn together, then sewn onto the flattened lens hood
cover piece (see
diagram). Next, the cover was wrapped around the
hood and the ends pinned to approximate fit. The pinned
loop is turned wrong side out and sewn together, with
the intention that it be slightly loose.
Now
with the loop turned right side out (right
photo), slide the cover over the hood for a test
fit. If it's a little loose, guesstimate how much less
the diameter should be and reseam the ends a little closer
(no need to undo the first seam, just fold the extra under
while test fitting). |
Once
a snug fit is achieved, trim off the excess from the original
seams and slide fit onto the hood. If this is done right,
the front edge seam will catch over the edge of the hood
and it will stay snug until you remove it for storage.
The finished hood covering is shown in the left and right
photos.
NOTE: Be sure your little "3D leaves" do not flop
over the front of the lens hood and block your shots.
Keep them short enough that if the wind catches them they
will not bend over the front either.
A
reminder here that if your lens front element DOES NOT
ROTATE when focusing, you do not need to make a
separate cover for the lens hood. In such a case, the
lens cover can extend out to cover the hood.
The
photo at right shows these 3D leaves as they look on the
lens cover. As you can see, their shape and size vary
quite a bit. I even used different materials on some of
them to provide variation.
|

|
 |
CAMERA-LENS
BARREL COVER:
At
left is the lens barrel cover laid out flat. At right
is the cover turned upside down to show the inside (underside).
This is made from a rectangular piece of camo material
cut large enough to fully cover the lens and camera length.
(I have not provided specific dimensions since your
lens and camera are quite likely different from mine.)
Add
about one inch of excess on two sides and the front to
use for a hem of about 1/2 inch. Add about 2.5-3 inches
extra at the back to allow for a wide hem of about 2 inches
over the camera body. Both the front hem, and especially
the wide back hem should have some stiffening material
inside (like a collar or cuff does) to give them some
body. (More on this below.)
NOTE: You can avoid the one small error that I
made in planning the size of my cover. I failed to take
into account the extra bulk of my fist around the camera
body grip. This effectively makes the grip side of my
cover ride up higher than the other side because my fist
is under there. So, when sizing your cover material, allow
about 2 inches extra width at the back corner of the material
by the camera grip so that it flares out wider than the
other side. This will allow it to hang down farther to
better cover your grip hand when using the camera.
Allow enough width across the front
so you can wrap it loosely around the lens barrel front,
plus an extra two inches for 2 one-inch tabs where the
front will "velcro" together (refer to photo
1 and photo
2 below for velcro tabs). Make the back end wide
enough to drape across the top and all the way down the
sides of the camera body. A little too big is better than
a little too small.
The
basic shape of the camera/lens cover when completed is
shown in the top half of the thumbnail diagram at right.
Here is an enlarged
view of the diagram.
These
photos (two at left and the far right) show how the cover
wraps around the front lens element and connects with
velcro as mention above. The right photo also clearly
shows additional "leafy" frills around the lens
front which are not indicated in the cover diagram. These
imbellishments are up to you. Add whatever details you
feel are helpful.
You
might notice also in the right photo that the front hem
round the lens looks a little "puffy". This is because
I used a thin strip of something to add some body to the
hem. I also did the same thing to the wide
hem at the back that goes over top of the camera
body. There are various types of stiffening material to
use in hems, collar, cuffs and such in garment sewing,
all available at sewing/fabric shops, I chose a thin sheet
of craft material called "Foamie" sheets, made
by Darico, Inc. This
8.5x11 inch sheet of rubbery feeling foam is 2mm thick
and comes in various colors. You'll probably want to use
black. In mine I happened to use white since it was already
on hand. It's soft, but has just enough body for this
purpose. It cuts easily with scissors like fabric, and
sews easily as well. I purchased mine from the craft section
of Walmart, but I suspect many craft/hobby suppliers carry
this as well.
|
In
the photo at right you see the additional arched foliage
frills I added to the cover, sewn to the wide hem band
that hangs down the side of the camera body. They are
also shown in the bottom half ot the diagram
at left.
The
diagram also shows stringy looking frills hanging down
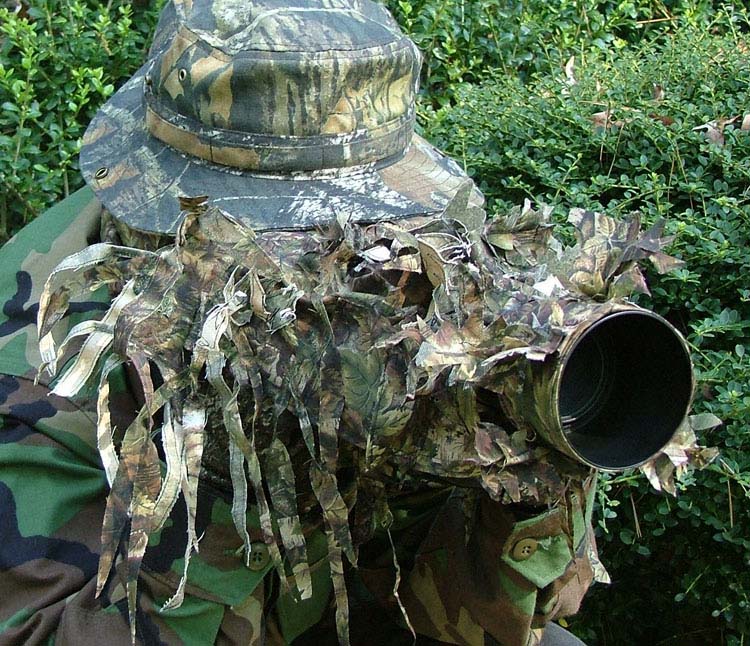
the side of the cover. These "frills" are quite evident
in this photo
you saw at the top of the page. You can design your own
foliage frills if you wish. They do not have to be made
just like mine. |
ATTACHING
THE COVER TO THE CAMERA BODY:
Okay,
here's where you might have to get creative. In these
photos I am trying to show how I attach the cover to the
camera body. The technique used is deceptively simple,
and very quick and easy to put on and take off. However,
whether this works for YOUR camera body depends on the
shape of your camera body. Refer to the diagram at the
far left(click on the thumbnail for a larger view), and
then reference the diagram to the four photos here and
the three photos next to the diagram thumbnail. Hopefully
this will explain the concept of how I attached the cover
to the camera. |
The
diagram
above left shows the general shape of my Canon camera
body. There is a lip overhang above where the lens attaches
to the body. Look at this photo
which shows that some of the "foamie" sheet I used for
the stiffener inside the wide hem over the camera body
end was allowed to hang out from the hem, The part that
hangs out is doubled over and stitched to make a thicker,
stiffer strip. Then a piece of narrow elastic band is
attached to this. This doubled-over strip slips under
the lip of the camera body, and the elastic band is slipped
over the flash head and under the edge of the viewfinder
rubber cup. The other photos show various views of this.
The
diagram
shows this as well. The thick white line in the diagram
represents the stiffener material, and the yellow band
represents the elastic. Hopefully between this diagram
and the photos it becomes clear how the cover is held
in place. The elastic strip does not interfere with any
of the buttons or controls, nor does it interfere with
the viewfinder.
Again,
I cannot say this will work for all cameras, as their
shape may not be right to use this method, but at least
this should give you some idea how to go about making
it work for your camera.

|
One
other handy little feature I added is a small pocket
with cover flap to store the lens cap when I'm
shooting. I use a retainer strap to keep my lens cap attached
to the camera when it's off the lens, and it dangles in
the breeze. If the camera is on a tripod, the cap invariably
bangs against the tripod in a light breeze, making unwanted
noise. This little pocket solves that problem handily.
USING
THE CAMOUFLAGE COVER:
As
you can see in these photos at right, the camera controls
are quite easily visible from the back, even though the
camera is well camouflaged from the front. The camera
is easy to grip, and the zoom and focus rings on the lens
are easy to reach because of the open
design under the cover. The cover also helps to
hide your hands, although I recommend wearing camo gloves
to be sure your hands don't show.
And
now for the final test. Here's how the camera-lens camouflage
cover looks in use.
CAMOUFLAGE
FACE MASK:
In
conjunction with the camera camouflage, I use the
homemade
face mask shown here. Of course, you can
buy a face mask, which I will admit, is much less
trouble than making your own. But I didn't like
the design or the material of any that I could find
in the stores. Besides, I like making stuff, so
I made one for myself. |
|
|
|
 |
|
 |